All About Siril For Image Processing In A Nutshell

Compiled by Jane Lubenskyi 

This Presentation includes an initial overview and following links to working examples in the Siril Software.

First Presented To Montreal RASC Zoom Meeting : Sept 22 2021

A Note about this presentation to Montreal RASC

This will be a 30 minute presentation of the Siril software on pre and post processing of astro images. 

…Additionally I have prepared a compilation of my own notes as they apply to YouTube links by other people which I will discuss briefly and make available on my website, Astronomy Notebook https://astronomynotebook.ca/ for your future reference.

…The combination of a verbal run through of the Siril software and my compiled notes and links for further reading will be the most efficient way to get the most information across within the time allotted instead of having people sit through the rituals of pre and post processing.

✨✨✨✨✨✨✨✨✨✨✨✨✨✨✨✨✨✨✨✨✨✨✨✨✨✨✨

SIRIL is an astronomical image processing tool.

Siril works internally with 32-bit floating point Fits images. Users can configure the program to work in unsigned 16-bit FITS format, in order to save computation time and disk space at the expense of image accuracy. 

However if the goal is to get the best image possible then stay in 32 bit for as long as possible.

Siril can convert the SER file format (a simple image sequence format, similar to uncompressed movies. Files in this format, widely preferred by astrophotographers in planetary imaging but also can be used in DSO imaging as well. (Sharpcap is a software that can image in Ser format.)

Features include :

-can run on Linux, Windows and Mac

-processing of the images can be via the use of scripts or manually

-can work and save in 32 bit (important to getting a higher dynamic range)

-Supported input types: 8-bit,16-bit, 32 bit BMP, TIFF, JPEG, PNG, FITS and 

  RAW DSLR images, Ser, AVI video files

-preprocessing image calibration…darks, flats 

-image registration and alignment in a choice of modes including single 

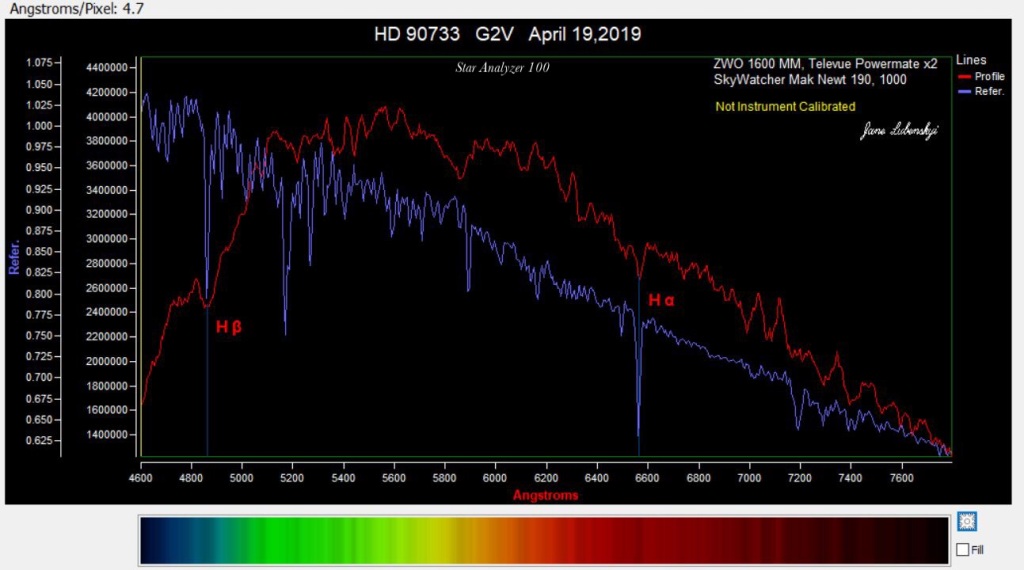
  Star which is helpful in Spectroscopy images of stars

 -Image stacking, with optional additive or multiplicative normalization, 

   Modes including Summing, Median, Average with different rejection 

   methods such as Summing, Median Average with rejection

  -Enhancement and processing of final images including:

  • Lightness/contrast cursors on each layer, different scaling modes (linear, log, square root, squared, asinh, histogram equalisation), negative and false colour rendering and clipping
  • Background removal tool
  • Cosmetic correction tool
  • Channel extraction and combination
  • Photometric and Color Calibration 

In addition note what else Siril can do…

Siril has a photometric analysis tool. Therefore, it is possible to study the transits of exoplanets, the variability of stars or even occultations. This tool requires the installation of gnuplot .

………………………

Siril  website:

Siril

SIRIL SCRIPTS

Downloads…choose your platform

Downloads

Documentation and Video Instruction

This is a good starting point tutorial for Siril image processing…

https://siril.org/tutorials/tuto-scripts/

https://siril.org/tutorials/tuto-scripts/

Tutorial for a complete processing of astronomical images with Siril and its scripts

Other tutorial sources…

Tutorials

Frequently asked questions on Siril…

FAQ

……………Notes on use of Siril with accompanying Reference UTube………

Using Siril ….An Overview

After download, install and open Siril…

Siril only works directly with Fits files, so it is necessary to load and convert the images first…it saves all conversion and preprocessed, registered and stacked files in a folder which you must specify in the setup at the beginning when opening the software.

Essentially the workflow is from left to right,on the right hand side and top of  the Siril screen starting at “Conversion” this pre step is needed in order to change the files into a format that Siril can use. After this we then proceed to preprocessing such as calibration of darks, bias and flats using stacked masters that you have to create beforehand in Siril. Then this is followed by registration, alignment and finally stacking. From this point Siril has many features for image enhancement such as background extraction, cosmetic correction, deconvolution, photometric or regular color calibration, arcsin stretching and histogram transformation to include some of the main enhancement features.

Please note that depending on your skill using Siril and the particular difficulty of the image you may find it easier at some point to continue the image enhancements and tweaks in other software…again try to stay in 32 bit for as long as possible before downsizing…

👉As I side note regarding down sizing, I have found that noise can be significantly reduced in just going from 32 bit to 16 bit… thus not requiring your complete efforts and attention to significantly reduce the noise at the 32 bit level.

So to continue….Save in Siril as 32 bit…

I recommend to save your image so far processed in Siril, (after doing your histrogram stretch to make the image non-linear)

as a 32 bit Tiff file and choose “embed adjustments” upon saving. 

From this point on which will not be the topic of this talk,

I use Gimp and Raw Therapee which are both 32 bit working image environments…

I later save to 16 bit Tiff and use a combination of Photoshop CS2 for its use of masking and layers and to help with my stars for reduction of size and color and also use Luminar to bring out more detail using the terrific and versatile brush tool.

………….

Working Examples

Online YouTube Links and my associated notes

Referring to the video below…

Completely manual image processing in Siril

First convert your files into a format that Siril can use.

As soon as this is done a sequence in Siril is created. Sequences are the basis of the workflow…moving from left to right on the top right hand side of the Siril main window.

(Note click “symbolic link” if you already have fits files.)

If you have calibration frames do not select “debayer” at this point.

For Bias calibration frames a sequence is the created. No need to preprocess or register just choose stacking and Median and no normalization.

To erase files in console window click on bottom right icon.

Do same for Darks.

Do flats…but now if you want to preprocess with Bias choose preprocess and find your master Bias stacked file.

Then after preprocessing do not need to register.

Go to Stack, choose “median”  and now use “multiplicative normalization”.

Now clear console, add lights. Name sequence and hit convert.

Note still at this stage in B&W because did not choose debayer in the processing yet.

If do not have darks check offset. And use the master off set…ie the Bias stacked created before. 

Check flats and use the master stack flat file.

But if have Darks do not choose Check Offset  …that is do not use the master bias file. (Why because your flats have been preprocessed as already done with the bias.)

While still in PreProcessing uncheck “optimization” , check “Equalize CFA”, “cosmetic correction”,  choose “debayer”… see image below:

Note : If you follow the workflow where you subtract the Darks from the lights as in this video you do not check optimization.

This is what should be checked…

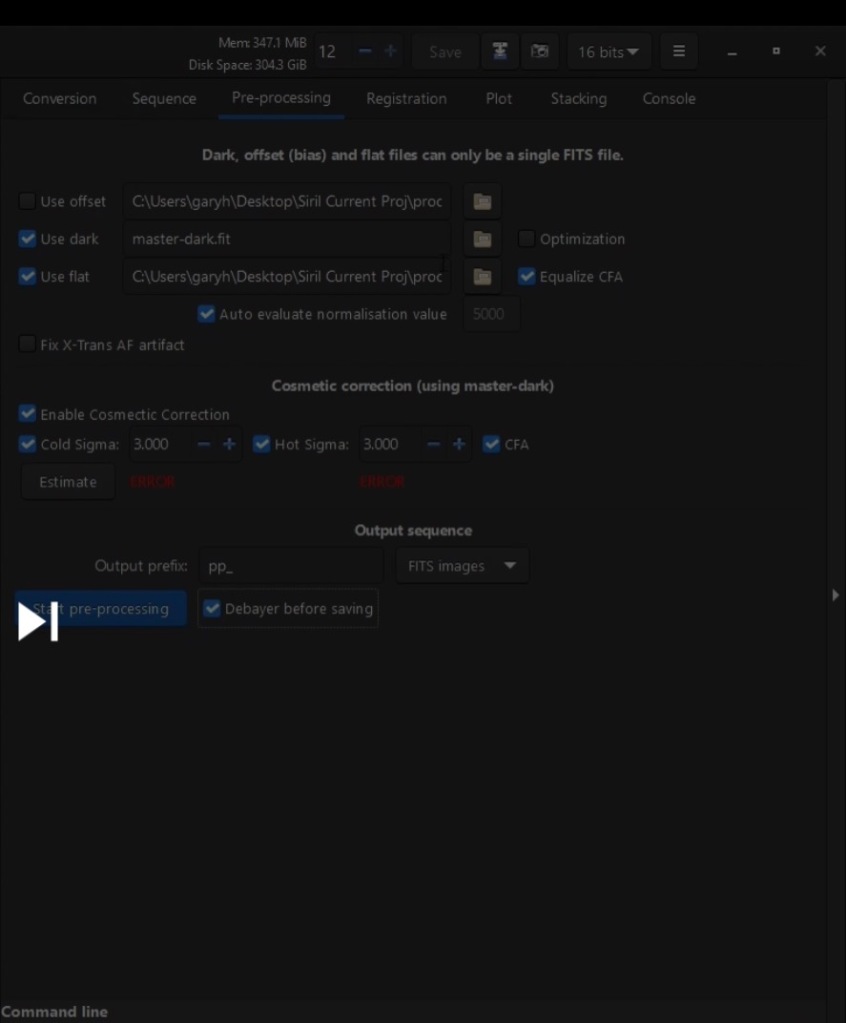
Click on  Start PreProcessing.

Now Go to Sequence and you can see your files thus created by choosing “ open frame list”.

Write “close” in the bottom of the console to free up memory at this point.

Now go to Register…choose the pre processed sequence, choose Globle Star Alignment, choose Green as registration layer to use.

The screen should be filled out as in image below…

Plot  in the next tab will then give an idea of image quality.

Choose left most icon at bottom of console to open frame list.

Now within the frame list window choose FWHM on the top right of this window to sort the images.

Here you can check quality visually and uncheck image files you do not want to be in the subsequent stack by clicking on the actual plot window. 
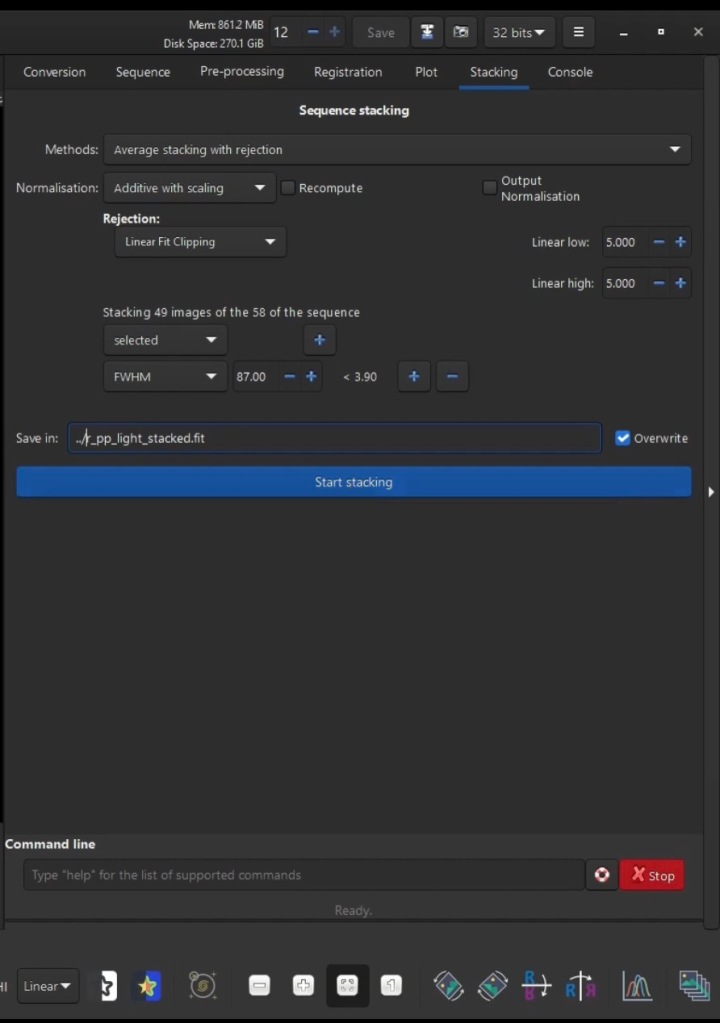
Now Go to Stacking…

Set up the Stacking Window like this…

Choose Linear Fit as more modern as this is what PixInsight uses.

Now a little post processing…

Check image with auto stretch and the histogram modes…

While in the histogram mode…can crop image from stacking artifacts.

👉Note: You really should crop as a first step as the stacking artifacts will interfere in subsequent post processing enhancements.

Go to AutoStretch mode

Do BackGround Extraction for gradient problems.

👉Note: can remove dots with a left click…add with a right click.

Go to the Histogram mode and click on the Do and Redo button to compare the change.

Go to AutoStretch 

Can first do a Green Reduction if the noise in green is very predominant.

Do Color Calibration…do the background and the while calibration here.

May need to remove more green noise again at this point.

Can also do after this a Photometric Color Calibration while still in AutoStretch mode.

👉Note: you can run this process again…gets rid of green and fixes background.

👉Note: Since this step involves a plate solve we could label the image…click on 3rd icon at bottom left below console.

👉Note: Can take a snap shot in png file format…click on icon which is 2nd to the right of the save button on top of console.

Next, Cosmetic correction particularly useful to run if have no Dark 

frames.

At this point good idea to save as a 32 bit Fit if ever have to com back and do a re-stretch, for instance.

Now start stretching, first change to linear mode.

👉A good idea not to stretch too much in Siril…why because can stretch further in Gimp  from the saved 32 bit floating point file ( or from 16 bit saved integer to PS) using masks so as not to bloat the stars.

So for the stretching do an Arcsin which is a Color preserving technique.

Could do say two iterations of this and then do a Histogram stretching…(see short cut icon at bottom right.)

Could do another Arcsin.

Now save by choosing the icon for save ( Not the save button) as a 32 bit floating Tiff if using Gimp or as a 16 bit integer for PS and check embed data.

👉Important Note: You would not choose the printed word  “save” 

button as this would over write your original linear fit file.

…………….

How To To Run Scripts in Siril 

The video below shows where and how to install scripts into Siril.

This video how’s how to work with OSC images using scripts.

Then after scripts run for preprocessing ,registration and stacking, enhancements are further done in this video:

AutoStretch mode

Crop Image (choose maintain aspect ratio)

Choose 2nd white square icon from right “fit to view” to fit to view after crop.

Background Extract …really necessary if you did not calibrate with flat frames.

Photometric Color Calibration 

👉Note when choosing focal length for a DSLR it is just what is indicated on the lense not a calculation with the crop factor here.

Change to Linear mode

Choose Arcsin and run twice

Choose Histogram Transformation

👉Don’t clip more than 0.1% of shadows using the left button on the histogram.

Green Reduction

👉Here in this video Green Reduction is recommended to do only after stretching image.

Choose Color Saturation

Can choose Global or individual colour.

Click on do and Redo button on top left to compare before and after.

At this point save as Tiff as 16 bit integer for PS or 32 bit floating point for Gimp.

👉Note: This video near the end when the fellow changes from Siril to PS processing, describes a terrific method that I have not seen quite like this before used elsewhere,on how to enhance a DSO using “High Pass Filter” but at the SAME TIME  how NOT to affect the stars.

👉Note: A frequent problem is the chromatic aberration of stars which can be fixed as this video demonstrates 

UPDATED Astrophotography Image Processing – Easiest and Best Method for 2021

………

👉How to setup Siril for preprocessing and processing images that have different exposure levels…

👉 So to my understanding, according to the tutorial below, multiple sets of images taken from different night and hopefully can also apply to different cameras and be combined by first preprocess each camera or exposure level… and continuing the index numbering by setting that in Siril, where the previous set left off…that way will take it as a single sequence….then register and stack as usual.

Combining sequences in Siril – Wolf Creek Observatory

……………..

👉Dual band channel extraction

This tutorial is useful for those who have an OSC colour image created using a duo band filter. Frequently one would want to augment the usually weaker Oiii detail and really the best way is to first extract the HA and Oiii as two different images, work on them separately and to recombine which can be done in Siril. 

Note: This process done in Scripts requires that in your Working Siril directory you make subdirectories of Biases, Flats, Darks and Lights or the script will not work. For other scripts in Siril pay attention what preliminary requirements are need for the script to b implemented successfully.

Duo narrowband OSC processing using Siril and some Photoshop

………………………………

For my additional notes on image processing (Gimp, PS, Raw Therapee):

MY Ongoing Image Processing Notes Part 1

My compilation of the best tutorials with my own associated notes that addresses how to accomplish further enhancements such as star color, star reduction, noise reduction, improve detail in nebula, reduce bloating in centre of galaxies much more.

Clears Skies,

StarJane 😊

✨✨✨✨✨✨✨✨✨✨✨✨✨✨✨✨✨✨✨✨✨✨✨✨✨✨✨✨✨✨✨

My Astro Imaging Journal

April 9, 2021

Home Balcony

Canon 70D, lens at 200mm

SkyWatcher Star Tracker, Star Analyzer 100

Backyard EOS software

Discovered the use of the BYE software for focusing on the spectrum using a DSLR camera…it is a question of taking automatic series of images while manually adjusting the focus and checking the HFR.

April 18, 2021

Home Balcony

SkyWatcher Mak Newt 190

ZWO 1600, Televue Powermate 2x

Learned how to attach Powermate to imaging train.

Discovered that the addition file “conv” is great to add to layers post processing to bring out the details in the main image…so use it!

Also it was the first time used dark calibration in processing moon images…wonder if flat frames might also be useful here too…

To test:

Still cannot get the Powermate 4x to focus

April 19, 2021

Home Balcony

Skywatcher Mak Newt 190

ZWO 1600, Televue Powermate 2x

Star Analyzer 100

Sharpcap software

Discovered how to add the Televue Powermate to the imaging train previously by focusing on the moon in a previous session.

Used Sharpcap software to get good focus on the spectrum (not the star) by zooming in and adjusting focus manually on telescope.

The trick is to get the lines in the spectrum as narrow as possible.

May 27, 2021

Home Balcony

Solar Imaging

Lunt 70, ZWO 1600, Daystar Quark

Siril is great for post processing Ser video.

Imppg is great to process and sharpen images as well as to get the proms and surface detail out in same image. (See Solar Imaging and related topics in IPad NOTES)

May 29, 2021

Home Balcony

Lunt 70, ZWO 1600, Daystar Quark

Solar Imaging:

❤️❤️❤️❤️ discovered that using the roi instead of the full frame of the camera allows faster capture speeds but does not decrease the resolution…a solar spot or flare taken by this method was my best so far…also take it using Ser videos and lucky imaging…at the lowest exposure possible as this will allow for increase in capture speed.

❤️❤️❤️❤️ Locate a high-contrast part of the Sun. For white light imaging, the best target is the Sun’s edge. For more exotic filters, the Sun’s surface is normally sufficiently detailed for you to lock onto that. Even here, though, it’s good practice to choose a sunspot group or perhaps a dark hydrogen-alpha filament to give you a better focus.

❤️❤️❤️❤️Focusing method:

Zooming in in software help to focus as usual…

Also tried stretching button using the small histogram in Sharpcap and then focusing and then once satisfied reset the histogram…seemed to get better focus.

❤️❤️❤️❤️Perhaps the best additional focus technique is in Sharpcap Histogram….stretch the image using the icon….zoom in very deep and manually adjust focus, then go back and reset the image in the histgram

❤️❤️❤️❤️Also I believe in this image that are used dark and flat frames in calibration. The flat frames were created by the defocusing method.

Note:

Best to also include the solar location number of spot on Sun as well as not only date but also time in UT.

Use this site to get name of the current sunspots….

https://www.spaceweatherlive.com/en/solar-activity.html

Solar activity

It takes on average 27 days for the Sun to make one complete spin around its axis.

The Sun and Sunspots

https://www.weather.gov/fsd/sunspots

The spot below was either AR 2826 or 2827 and note it was near the AR 2828 which was said to be the cause of the large flare or prominence on the other side of the Sun in early July…see info video below my image that I took…

Some Background info on what happened in the month of July on the Sun…

Apparently AR 2846 was also another major sun spot or flare during this time…

NASA Detects Significant Solar Flare from the Sun on the Morning of July 3 2021

SOLAR ACTIVITY UPDATE: Solar Super Storm: July 15th, 2021..

Solar Storm Incoming! CME Sun Flare of July 20th Forecast to Reach Earth Today!

July 7, 2021

Home, balcony

Canon 70 D DSLR, Mak Newt 190, Orion 50, 162 mm guide scope,

ZWO 224 guide camera

DSLR Imaging With Mak

Note: To focus well requires first to find and focus the star field, preferably a bright star, in the view finder by first turning off the camera screen viewer. Then best to use BYE software and FWHM lowest number for stars…HFR highest number for lunar.

SGPRO and PHD2 seem to be problematic….although PHD2 is opened by SGPRO and proceeds to start guiding, SGPRO does not start imaging.

Found that it is best to open PHD2 first and to calibrate in region of interest, to stop it and then to start sequence.

So far getting Total RMS of about 0.85 “ in PHD2 without any tweaking.

It would be best to align the centre of guide scope with the main scope and then should get better guiding. So far can do at least 1 minute exposures without any observable star elongation…but 3 to 6 minutes does not produce too unacceptable result either. Multi star guiding is much better.

Check in my image processing notes as there is no problem to fix slightly elongated stars.

The DSLR needs no extension on the Mak Newt telescope and less then a finger width of extension outward in order to focus.

This time I set DSLR on bulb…try manual next time.

…………………..

To Test:

How to possibly attach ZWO 224 camera with Skywatcher Esprit 120:

See photo of DSLR, Orion 50 mm extender and Esprit 120

Use the Orion extender to screw onto the Field Flattener and then the 1.25 adapter for the 1.25 filter on the ZWO.

❤️❤️❤️❤️ was told that because the fov with this camera telescope combination is very small that the flattener is not needed and that could used the screw on 1.25 filter tube adapter to slip into the that of the telescope and the image would not suffer from elongated stars on the edges.

…………………

July 10, 2021

Home Balcony

Lunt 70, Orion 50 mm extension ZWO 224, Optilong L Extreme Filter

❤️Focus found at 6.5 mm on telescope focusing tube for future reference.

❤️Using this filter use exposure 20sec, gain approx 300

The Cresent Nebula was imaged using the Optilong L Extreme, 47, 60sec subs used to stack image…heavy in Ha but no Oiii detected in image after post processing.

❤️In order to focus on the stars do not need to switch out and use the lum filter although would initially be easier (must use the ZWO uv Ir cut filter)…instead use only the Optilong L Extreme filter at 20 sec exposure and 300 gain.

Stacking with Sharpcap is finicky but was able to do so M57, getting great colour…for some reason unable with NGC 6888…but found out in Sharpcap the day after that by raising the noise level in the settings of Sharpcap, post stacking could be done.

DSS for some reason was not able to stack NGC 6888 and center the image, although it could align the colours well.

❤️Discovered that there is a setting in DSS to get rid of the hot and cold pixels besides the one in the initial settings…see additional settings.

Siril was successfully used to calibrate and stack, used a combination of post processing tools, Gimp, PS, Luminar.

……..

To Test:

Would like to try adding the Oiii Narrowband to the image created.

And also to combine images of different exposures.

Also did not try to extract HA and Oiii from the OSC image in Siril in order to augment the Oiii….have to try that procedure.

…….

Aug 2, 2021

Home Balcony

Skywatcher Esprit 120

ZWO 1600

Nina 1.11 (Nightly Build)

Testing The 3 Point Polar Alignment Tonight…

As procedure to follow see on Polar Alignment particularly two videos the most useful…

Polar Alignment with Nina: 3 point anywhere in sky.

The Best New Polar Alignment Routine – With N.I.N.A

NINA Polar Alignment Using a Plugin (Polaris NOT Required!)

Tonight only got plate solving to work using the All Sky Plate-solver which does not need online backup …it is rather slow but reliable…also have to checkout why it constantly asks for confirmation of my telescope focal length….probably must reset up my equipment in Nina.

I was able to run the polar alignment routine and at one point it got me to 47’ total error…but it was windy interfering with this procedure.

Astap plate solver is supposed to work well in Nina…need to update and reinstall it and star database…H18

Did not have time to assess the step size and backlash size of focuser which must be left for next session.

…………

August 7, 2021

Notes: QHY 268C PH camera on my MSI laptop computer:

In Sharpcap use the QHY 268 C under the cameras section as it gives the most versatility wrt color and other controls…use the last Sharpcap Ver which I downloaded as there several on my computer.

In SGRO the camera also works with the current ver on my computer.

Note that temp control works in either of the above software. The maximum temp camera sensor can be lowered is 35 deg C BELOW AMBIENT temp…it is best to choose a temp for cooling that only causes the camera to work at about 33% power as this seems not to cause the camera body to get over heated to the touch. So say if outdoor temp is 20 deg C then could choose to cool down to 0 deg or to -5 deg C…do not set it so it will reach the maximum decrease as it will cause the camera to operate at 100% power….this level of power usage by the camera can be seen in the temp control section in SGPRO.

⭐️⭐️⭐️⭐️⭐️Also better NOT to run the ASCOM Diagnostics App to connect to the camera either in 32 or 64 bit because this is what messed up my set up that was previously working…also I then had to reinstall the ALL In One QHY install again choosing and checking off everything except software 3rd party but making sure to check off the SDK for the 3rd party software that I have already on my computer like Sharpcap and Nina.

…………….

August 11, 2021

Cloudy Skies in Montreal

Discovered how to attach my QHY 268 C to the Daystar Quark…

See image below…but need some short screws…hardware store hear I come.🤨

My Astro Imaging Journal

April 9, 2021

Home Balcony

Canon 70D, lens at 200mm

SkyWatcher Star Tracker, Star aAnalyzer 100

Backyard EOS software

Discovered the use of the BYE software for focusing on the spectrum using a DSLR camera…it is a question of taking automatic series of images while manually adjusting the focus and checking the HFR.

April 18, 2021

Home Balcony

SkyWatcher Mak Newt 190

ZWO 1600, Televue Powermate 2x

Learned how to attach Powermate to imaging train.

Discovered that the addition file “conv” is great to add to layers post processing to bring out the details in the main image…so use it!

Also it was the first time used dark calibration in processing moon images…wonder if flat frames might also be useful here too…

To test:

Still cannot get the Powermate 4x to focus

April 19, 2021

Home Balcony

Skywatcher Mak Newt 190

ZWO 1600, Televue Powermate 2x

Star Analyzer 100

Sharpcap software

Discovered how to add the Televue Powermate to the imaging train previously by focusing on the moon in a previous session.

Used Sharpcap software to get good focus on the spectrum (not the star) by zooming in and adjusting focus manually on telescope.

The trick is to get the lines in the spectrum as narrow as possible.

May 27, 2021

Home Balcony

Solar Imaging

Lunt 70, ZWO 1600, Daystar Quark

Siril is great for post processing Ser video.

Imppg is great to process and sharpen images as well as to get the proms and surface detail out in same image. (See Solar Imaging and related topics in IPad NOTES)

May 29, 2021

Home Balcony

Lunt 70, ZWO 1600, Daystar Quark

Solar Imaging:

❤️❤️❤️❤️ discovered that using the roi instead of the full frame of the camera allows faster capture speeds but does not decrease the resolution…a solar spot or flare taken by this method was my best so far…also take it using Ser videos and lucky imaging…at the lowest exposure possible as this will allow for increase in capture speed.

❤️❤️❤️❤️ Locate a high-contrast part of the Sun. For white light imaging, the best target is the Sun’s edge. For more exotic filters, the Sun’s surface is normally sufficiently detailed for you to lock onto that. Even here, though, it’s good practice to choose a sunspot group or perhaps a dark hydrogen-alpha filament to give you a better focus.

❤️❤️❤️❤️Focusing method:

Zooming in in software help to focus as usual…

Also tried stretching button using the small histogram in Sharpcap and then focusing and then once satisfied reset the histogram…seemed to get better focus.

❤️❤️❤️❤️Perhaps the best additional focus technique is in Sharpcap Histogram….stretch the image using the icon….zoom in very deep and manually adjust focus, then go back and reset the image in the histgram

❤️❤️❤️❤️Also I believe in this image that are used dark and flat frames in calibration. The flat frames were created by the defocusing method.

Note:

Best to also include the solar location number of spot on Sun as well as not only date but also time in UT.

Use this site to get name of the current sunspots….

Solar activity

It takes on average 27 days for the Sun to make one complete spin around its axis.

The Sun and Sunspots

https://www.weather.gov/fsd/sunspots

The spot below was either AR 2826 or 2827 and note it was near the AR 2828 which was said to be the cause of the large flare or prominence on the other side of the Sun in early July…see info video below my image that I took…

Some Background info on what happened in the month of July on the Sun…

Apparently AR 2846 was also another major sun spot or flare during this time…

NASA Detects Significant Solar Flare from the Sun on the Morning of July 3 2021

SOLAR ACTIVITY UPDATE: Solar Super Storm: July 15th, 2021..

Solar Storm Incoming! CME Sun Flare of July 20th Forecast to Reach Earth Today!

July 7, 2021

Home, balcony

Canon 70 D DSLR, Mak Newt 190, Orion 50, 162 mm guide scope,

ZWO 224 guide camera

DSLR Imaging With Mak

Note: To focus well requires first to find and focus the star field, preferably a bright star, in the view finder by first turning off the camera screen viewer. Then best to use BYE software and FWHM lowest number for stars…HFR highest number for lunar.

SGPRO and PHD2 seem to be problematic….although PHD2 is opened by SGPRO and proceeds to start guiding, SGPRO does not start imaging.

Found that it is best to open PHD2 first and to calibrate in region of interest, to stop it and then to start sequence.

So far getting Total RMS of about 0.85 “ in PHD2 without any tweaking.

It would be best to align the centre of guide scope with the main scope and then should get better guiding. So far can do at least 1 minute exposures without any observable star elongation…but 3 to 6 minutes does not produce too unacceptable result either. Multi star guiding is much better.

Check in my image processing notes as there is no problem to fix slightly elongated stars.

The DSLR needs no extension on the Mak Newt telescope and less then a finger width of extension outward in order to focus.

This time I set DSLR on bulb…try manual next time.

…………………..

To Test:

How to possibly attach ZWO 224 camera with Skywatcher Esprit 120:

See photo of DSLR, Orion 50 mm extender and Esprit 120

Use the Orion extender to screw onto the Field Flattener and then the 1.25 adapter for the 1.25 filter on the ZWO.

❤️❤️❤️❤️ was told that because the fov with this camera telescope combination is very small that the flattener is not needed and that could used the screw on 1.25 filter tube adapter to slip into the that of the telescope and the image would not suffer from elongated stars on the edges.

…………………

July 10, 2021

Home Balcony

Lunt 70, Orion 50 mm extension ZWO 224, Optilong L Extreme Filter

❤️Focus found at 6.5 mm on telescope focusing tube for future reference.

❤️Using this filter use exposure 20sec, gain approx 300

The Cresent Nebula was imaged using the Optilong L Extreme, 47, 60sec subs used to stack image…heavy in Ha but no Oiii detected in image after post processing.

❤️In order to focus on the stars do not need to switch out and use the lum filter although would initially be easier (must use the ZWO uv Ir cut filter)…instead use only the Optilong L Extreme filter at 20 sec exposure and 300 gain.

Stacking with Sharpcap is finicky but was able to do so M57, getting great colour…for some reason unable with NGC 6888…but found out in Sharpcap the day after that by raising the noise level in the settings of Sharpcap, post stacking could be done.

DSS for some reason was not able to stack NGC 6888 and center the image, although it could align the colours well.

❤️Discovered that there is a setting in DSS to get rid of the hot and cold pixels besides the one in the initial settings…see additional settings.

Siril was successfully used to calibrate and stack, used a combination of post processing tools, Gimp, PS, Luminar.

……..

To Test:

Would like to try adding the Oiii Narrowband to the image created.

And also to combine images of different exposures.

Also did not try to extract HA and Oiii from the OSC image in Siril in order to augment the Oiii….have to try that procedure.

…….

Aug 2, 2021

Home Balcony

Skywatcher Esprit 120

ZWO 1600

Nina 1.11 (Nightly Build)

Testing The 3 Point Polar Alignment Tonight…

As procedure to follow see on Polar Alignment particularly two videos the most useful…

Polar Alignment with Nina: 3 point anywhere in sky.

The Best New Polar Alignment Routine – With N.I.N.A

NINA Polar Alignment Using a Plugin (Polaris NOT Required!)

Tonight only got plate solving to work using the All Sky Plate-solver which does not need online backup …it is rather slow but reliable…also have to checkout why it constantly asks for confirmation of my telescope focal length….probably must reset up my equipment in Nina.

I was able to run the polar alignment routine and at one point it got me to 47’ total error…but it was windy interfering with this procedure.

Astap plate solver is supposed to work well in Nina…need to update and reinstall it and star database…H18

Did not have time to assess the step size and backlash size of focuser which must be left for next session.

…………

August 7, 2021

Notes: QHY 268C PH camera on my MSI laptop computer:

In Sharpcap use the QHY 268 C under the cameras section as it gives the most versatility wrt color and other controls…use the last Sharpcap Ver which I downloaded as there several on my computer.

In SGRO the camera also works with the current ver on my computer.

Note that temp control works in either of the above software. The maximum temp camera sensor can be lowered is 35 deg C BELOW AMBIENT temp…it is best to choose a temp for cooling that only causes the camera to work at about 33% power as this seems not to cause the camera body to get over heated to the touch. So say if outdoor temp is 20 deg C then could choose to cool down to 0 deg or to -5 deg C…do not set it so it will reach the maximum decrease as it will cause the camera to operate at 100% power….this level of power usage by the camera can be seen in the temp control section in SGPRO.

⭐️⭐️⭐️⭐️⭐️Also better NOT to run the ASCOM Diagnostics App to connect to the camera either in 32 or 64 bit because this is what messed up my set up that was previously working…also I then had to reinstall the ALL In One QHY install again choosing and checking off everything except software 3rd party but making sure to check off the SDK for the 3rd party software that I have already on my computer like Sharpcap and Nina.

…………….

August 11, 2021

Cloudy Skies in Montreal

Discovered how to attach my QHY 268 C to the Daystar Quark…

See image below…but need some short screws…hardware store hear I come.🤨

My On Going Processing Notes Part 1

Gimp, Photoshop, StarTools, Raw Therapee, 32 bit processing….

also links to excellent and key tutorials to follow as you process your images

                                    🔭🔭🔭🔭🔭🔭🔭🔭🔭🔭🔭

🔭😊⭐️This is a compilation of ongoing notes that I am creating and continually tweaking on the topic of image processing… as I continually follow the arduous path in learning this difficult but wonderful skill.  Associated and included are key sites that I have found particularly useful. 

Hope this will serve equally useful to you, my fellow hobbyists…

❤️Clear Skies,

Astronomy Notebook

https://www.facebook.com/groups/350767592003671/?ref=share

Calibration Frames

How To Obtain Darks, Flats And Bias Frames

To make stars Round…

If your stars are slightly oval try this in photoshop:

  1. Duplicate the image (ideally fully processed) as a new layer.
  2. Set the duplicate layer blending mode to “darken”
  3. Then apply Filters -> Other -> Offset and nudge the vertical and horizonal offset values until you get round stars.

❤️❤️❤️❤️❤️This video shows how to round all stars in image at once with the arrow keys and seems to be the best method.

How to fix elongated stars in Photoshop

How To Make Stars Smaller in Adobe Photoshop [For Beginners!]

❤️❤️❤️❤️This video is good to set an action to round up star  individually

Rounding up stars and setting an action

❤️❤️❤️❤️The following video is probably one of the best method as it fixes all the stars at once by shifting with them with the keyboard arrow keys…almost like a simple derogation…because even if you have great guiding you may not be so well polar aligned and this will cause some rotation in your images as the imaging session progresses…

How to fix elongated stars in Photoshop

Reduce and Round Stars:

This video is the one to follow to get rounder stars…

❤️❤️❤️❤️❤️

Star Repair for Photoshop

StarTools Repair is also effective and has two modes of star 

Features & Documentation: Repair: Star Rounding and Repair

Elongated Star Repair w/ PhotoShop

Οδηγός διόρθωσης του trail με το Photoshop.wmv

Cant get round stars – is this guiding issue or something else? – Beginning Deep Sky Imaging – Cloudy Nights

…………..

This video is great to follow completely, with free software using DSS, Siril, Gimp and Starnet:

Astrophotography processing – FREE SOFTWARE ONLY!!

…………

Nebula:

Here he does not deal with any star color…just size with respect to masking.

GIMP Astrophotography Editing Tutorial

Here nebula can gain more detail by  adding this adjustment to the top layer and decreasing fade to approx 50%

Galaxies:

He does not deal with star color with his created masks in this vide.

ANDROMEDA GALAXY with only a Camera, Lens, & Tripod, Part 2a, Deep Sky Stacker & GIMP

……probably best to keep the gain low and use short exposures and stack lots of frames. Then, if you want to go really deep just add some frames with longer exposures and create an HDR. However, you can get perfectly adequate images without going to HDR.

Stars:

I too struggle with this,but I have found that shorter subs help. I use 150s subs for the RGB background. After you’ve blurred the stars to get the colour, try a  little colour saturation (in your program of choice) and then use a sharpening tool to make them nice and solid again. I find if I do that, followed by a size reduction step or two for the larger stars, the stars star to look a bit more colourful.

Use Noels ‘increase star colour’ along with decent gaussian blur to colour up but soften the stars in bottom layer.

Set the top layer to ‘luminosity’ to restore sharpness.

The thing that made the difference for me was making a mask, just allowing work on the bigger stars, then switching to Lab mode and using the saturation slider a little… I thinks its come out pretty good… compared to my first go.  It does something odd to the yellow stars… I got a few bicolour yellow blue stars that had to be erased! I have a way that works 

*****❤️Read that should make a copy or original image and from that copy first work on stars in the image to get color and then take out the stars as a layer. 

****Maybe during the process of stretching the image could highlight select the stars and copy and past them into a new layer…that is make them visible in that layer….turn those layers off until needed…could then recombine the stars into one star only layer to retain the size and star color or use opacity changes to bring out the stars. Also can use these star layers and merge and make a star mask to further process the main image while not affecting the size of the stars…that way when the star layer or layers are revisible in the image there will not be halos or star color changes to affect the star layer or layers contributing to the overall final image.********

………………………….

How to add back to the image the removed stars:

Process the No Stars image in the usual way, then process the original image so that just the stars show and not too much background nebulosity. Then copy this image and paste  it in a new layer over the top of the starless image and set the blend mode to either Lighten or Screen…..whichever one works best. (Not sure however how the Screen effect in PS or similar software would affect the colour.)

……………………..

Star Clusters:

StarTools – a 4 minute process of Globular Cluster M13

……probably best to keep the gain low and use short exposures and stack lots of frames. Then, if you want to go really deep just add some frames with longer exposures and create an HDR. However, you can get perfectly adequate images without going to HDR.

……………….

This one applied to Gimp….make a duplicate top layer turned off in case get fringing so you can increase a Gaussian blur which the other guy in Gimp does not perform.

This technique is good to follow and parallel in Gimp for diffuse nebula RGB or other colour images to preserve star colours and size while stretching to get detail in nebula. But does not talk of manipulation of colours.

Astrophotography: Star control using Star Masks

❤️❤️❤️❤️………………………..

This video over all would be the main one to follow covering all aspects of regions to control in post processing in an image.

This video shows how to create select stars only to increase star saturation. Also by using both a star mask and using the selective and inverted mask of the more compact nebula or galaxy can work on the main regions of background or nebula or galaxy separately without affecting the stars.

Note that could also use the Gimp Quick Mask technique to select or invert regions to specifically process but the stars would be per this video.

How to Process Astrophotography Images using layer mask

……………………

❤️Gimp does not have arcs in stretch but if you do two arc sin curves with a levels in between in Gimp as in this tutorial but note the layer mode has to be changed….see tutorial. This will allow good stretch without loss of color.

Photoshop Color Preserving Arcsinh Stretch – DSLR, Mirrorless & General-Purpose Digital Camera DSO Imaging – Cloudy Nights

Gimic plug-in better noise reduction than in native Gimp.

This video also has a good star reduction that can be done I Gimp. The highlighted stars could be used to specifically saturate and change the colours of the stars as well as to make a star mask.

Processing The Rosette Nebula in GIMP 2.10. Beginner level Processing Tutorial

****Align Images In Gimp****

The alignment tool works very well…note that in the astronomy plugins in Gimp there is an alignment script which might be good to try.

This alignment procedure will be necessary as I have not been able to align as yet different exposures in DSS….so then after stacking the images separately in DSS and separately post processing follow this step below to align the different exposure images in Gimp…..

How to align images visually using GIMP

Also alignment is also possible in PS…next two videos…

How To Align Stars in Photoshop Manually

How To Align Stars in Photoshop Manually

Note that is is used primarily for images taken with the same setup but different exposures and is based on rotational and vertical and horizontal adjustments using the arrow keys…see also the video in this article.

❤️❤️Also this video can easily be followed for time lapse and how to process the ground level silhouetted against the lower horizon.

How to Align Astrophotos in Photoshop | Easy Way to Combine Your Data

******Exposure Blending*****

Taking two images one faster exposure to reveal detail that would otherwise be blown out….These two following tutorials are excellent and through the use of layers and associated adjustments allow the creation of more dynamic depth in the image. Done in PS as in tutorial below could also be done in Gimp where the added advantage is being able to work in 32 bit….make sure the images are aligned before!

My One BEST Editing Trick For Orion

Orion Nebula HDR Tutorial (Fix the Bright Core in Photoshop)

******How to Expose the Foreground *******

How to Expose the Foreground in a Nightscape

Easy Exposure Blending Trick in GIMP (Tutorial)

……..

******Tonal Adjustment….better than selective colour in PS.

Raw Therapee ****

Ultimate Raw Therapee Colour Correction Regions – Get Total Control of Colour

………..

****Use Selective color in different ways to change colours and make masks******

❤️❤️❤️When your regions are difficult to isolate can choose selective color see specifically 11.06 point in this video to make a mask according to the selective colours and change the color or any other characteristic of that region.

How to Replace Color in Photoshop CC 2017 | Adjust Color Selectively

Select by color in Gimp….this looks as close as you can get by doing it in PS…this will work well…

26) The Select by color tool

Need to find the equivalent procedures in Gimp for this video….

How To Change The Color of ANYTHING In Photoshop | Select and Change ANY Color

…………….

Nik Collection

Introduction to the Nik Complete Collection

Nik Collection…see exe files on Desktop (portable computer)

The ColorEfex.exe app in the Nik folder on my desktop is the best of all of the Nik apps and works on 32bit files….

HDR image is well done by the Nik collection…choose bracketing imaging on DSLR or take a series of different exposures with ZWO.

(The images would have to be aligned first and can do this in Siril)

The HDR program in this collection would probably be good for getting rid of the reflective regions on the moon….just take different exposure sets and stack them individually in DSS.  

….❤️but this procedure will not let you separately adjust and tweak the different exposures in an ongoing way before they are merged….so better to align the different exposures in say Gimp and tweak the individual exposure layers there. This method combined with imaging with a red 

and/or an IR pass filter will probably work very well.

…….. Notes……

Luminosity Mask 

Luminosity masks are basically layer masks that are built around specific tones in animage. They are derived from the image data itself, and focused on a specific range of tonal values. … Being able to selectively modify an image based on particular tonal regions can be a very powerful method of editing.

Note there is a luminosity mask creation script in Gimp. This can be used the same as selective colour in Gimp for processing very specific regions otherwise hard to do than by the lasso or tool selection….also note the luminosity masks that are automatically created in the script can be further changed by curves and levels.

Try using the luminosity masks created automatically with script in Gimp to perform precise and selective work on image….but will need a regular mask to protect specific regions or shapes in image.

Creating the Masks. To begin creating the masks we will need to first get a luminosity representation of the image. This is easily achieved by duplicating the base layer, and desaturating it using Luminosity as the conversion option.

……..

The Quick Mask 

Can use this to select or protect regions or to paste these regions on other layers….good for galaxy images and maybe star clusters like m13. Need to feather these regions or is it automatically done?

***❤️Could probably use this to inverse the galaxy mask selection to select the back ground then use either desaturate or levels to darken the background or the eye dropper to set black levels…could also do a Gaussian Blur to regulate the background night sky from pollution or dust.

GIMP Quick Mask In-Depth Tutorial

Layer Masks in Gimp…

Layer Masks in GIMP

…….

A method that can select the background for processing to darker and no dust or light pollution: this involves drawing the lasso around the object….must do a feather of say 150 or less pixels so regions will not look harsh.

Gimp: How to Use the Quick Mask and How to Blur the Background

Also note that in PS there is an action script installed to get rid of space dust and does so gently and well…could do several repeats.

………………………..

Miscellaneous Notes:

Excellent over all info in astro processing not really using as specific steps to follow.

Nightscape Photography with Digital Cameras, Clarkvision.com

👍Using “Blend If” to Neutralise Sharpening Haloes in Photoshop – You Can’t Do This in Lightroom👍

Starnet removes the stars so you can work separately on the nebula and at the same times safe guard the stars from becoming bloated and or losing color….

But you don’t have to do this using Starnet…you can select the stars say using an action tool in PS which does a great job at selecting even the faint stars and in layers subtract the stars from the complete image as was done in this video….

****Note: Check if is possible to use the image of just the stars in 16 bit in PS and and perfect the stars there and bring it into Gimp and change mode to 32bit on that image to further add to the layers in Gimp, say to the starless image after that has been processed by itself.

Make Your Nebula POP Using Starnet++

Contrast using wavelets

Raw Therapee WAVELETS Basics: Power Processing with Wavelets in Raw Therapee 5.8

This is an excellent tutorial on white balance using the black, grey and black points…

Precise White Balance in Photoshop – The FAKE Grey Card Method

Raw Therapee Basics: High ISO Noise Reduction Using Wavelet Levels.

……………..

The video below shows how to do color calibration by RGB Balancing and also a different way to darken the background and remove gradient without Gradient  Exterminator in PS….get rid of haze or noise in background by doing a mask and inverting it and then decreasing the saturation on the background. 

Another way is to make a flat frame using Dust And Scratches and using the Spot Healing Tool to erase the galaxy….but this is done to the starless image.

Use this to stamp a complete image that incorporates all the below and placing the new image layer on top while still keeping the individual layers…the command is:  

ctrl- alt -shift -E

****Note this could be done in Gimp while remaining in 32 bit processing instead…must find the equivalent process in Gimp for Dust And Scatches.

Learn Astrophotography Editing with this FREE Template | DeepSkyStacker/Photoshop Tutorial

……………..

❤️❤️❤️❤️Pixinsight excellent to follow for galaxy images

from batch stacking to processing….

How to Imaging and Process M31 In Ha LRGB

❤️❤️❤️❤️Bringing out the faint flux….

Going Deep on M81 and M82 Galaxies

…………………..

Using Levels and Curves:

❤️In this video below we see that first you must balance the colours…he does it by the histogram method. Next crop image if necessary and then use levels and curves to stretch image….of course he did not mask his stars in the stretching process but a a couple of stretches to bring out the star color it is best to do so….one approach is to make a working copy for star color and work on the stars separately….then the nebula in a separate image, perhaps mask the stars so they will get no bigger or further change color…work on nebula and try a screen with the star image on top to combine the separately worked on star and nebula image.

Using the historgram levels and curves

Here below in this video he adjusts the levels separately per channel giving a lot more control. When you are in levels to keep the background the proper hue, adjust the black point in the levels diagram on a per channel basis….while looking the effect in the color histogram.

How to stretch in PS…

STRETCHING Astrophotography in Photoshop Using Curves and Levels

How to use the Astronomy Tools Action set

Astronomy Tools Action Set Photoshop Overview

❤️❤️❤️❤️How to make colour images…

A Colour Primer for Astrophotography – RGB, LRGB, HaRGB, HaGB, Hubble Palette Narrowband & More!

………..

❤️❤️❤️Multi exposure images…how to combine…

Astrophotography – How do I create multi night images?

Combine Multiple Exposures (#Photoshop) for Amazing Landscapes

This refers to Pixinsight but is excellent on procedure concisely described…

Merging frme sets of different exposure lengths??

……….

Siril Imaging Post Processing…

How to edit DEEP SKY images in SIRIL – powerful FREE astrophotography software for Windows Mac Linux

PS Post Processing….

My 2021 Astrophotography Image Processing Tutorial!

Rogelio Bernal Andreo, Premium Astrophotography

………

Note that is is used primarily for images taken with the same setup but different exposures and is based on rotational and vertical and horizontal adjustments using the arrow keys…see also the video in this article.

❤️❤️Also this video can easily be followed for time lapse and how to process the ground level silhouetted against the lower horizon.

How to Align Astrophotos in Photoshop | Easy Way to Combine Your Data

❤️❤️❤️❤️Stacking different exposure times

Stacking different exposure times? – Beginning Deep Sky Imaging – Cloudy Nights

Don’t stack TIFF files

 ……….

Narrowband…

❤️❤️❤️❤️Dual band channel extraction

Duo narrowband OSC processing using Siril and some Photoshop

❤️

Hubble palette and star reduction

❤️❤️❤️❤️❤️Narrowband Post Processing….

How To Stack Monochrome RGB and SHO Images in DeepSkyStacker (DSS): Part 2 – Photoshop

Using hundreds or thousand of short narrowband subs?

Getting more colours from your dual band image….

Dual-Band Filter Processing for color cameras!

………….

❤️❤️❤️Post Processing in free software …workflow…

Astrophotography processing – FREE SOFTWARE ONLY!!

He does this in Startools…which is a great tutorial also in use of this software

20 min with ZWO ASI 2600 MC Pro vs 130 min with Canon EOS 60D on the Pleiades M45

Included here Imaging as this is so important to the final image….

ASI 2600mc pro: how to set the correct sensor temperature ?

Do a sensor analysis in Sharpcap on your new camera…

Astrophotography Cameras: How to use a OSC One Shot Color Astronomy Camera

I included this video here because a good image is the basis of a good result after post posting…

Deep Sky Astrophotography With CMOS Cameras by Dr Robin Glover

Method to establish proper gain

Duo narrowband OSC processing using Siril and some Photoshop

❤️❤️❤️❤️The video below is excellent on the use o Pixinsight in general as well and can be followed step by step.

How To Get Hubble Style Pictures From OSC Data! – Easy PixInsight Guide

The Optolong L-eXtreme Filter is INSANE!

Astro Pixel Processor Tutorial – Processing Dual Narrowband Data as HA/OIII BiColor

Siril Beginner’s Tutorial! – Hubble Style OSC Narrowband With FREE Software!

ADD H-Alpha to DSLR  Exposures / Astrophotography Processing Tips & Tricks series Part 1

Dual-Band Filter Processing for color cameras!

Dual-Band Filter Processing for color cameras!

Hubble Palette look with a OSC camera, L-eNhance filter and Pixinsight!

Note also here in the video how the stretched image is made permanent by the histogram fenction

Hubble Palette look with a OSC camera, L-eNhance filter and Pixinsight!

Bicolor Channel Combination in PixInsight: How to get your Oiii data to POP

Astrophotography Duo-Band Filter Processing Tutorial

❤️❤️❤️❤️Note Dual narrow band OSC image registered aligned and stacked…the stacked image can in Siril be extracted, maybe try back ground extraction, neutralization and Color calibration and do a histogram stretch to go to non linear, extract the resultant image for HA and Oiii, save these two files as Tiff 16 bit…bring the two images into PS as layers do a levels and curves to try to get the Oiii to stand out more in final image. Then assign to RGB channels….adjust colours, details, noise finally and star size and roundness in preferred software.

Otherwise if the above procedure of extraction is not done on the dual narrowband image there will be a predominant red ha color and little color due to Oiii.

The procedure works well in Pixinsight…particularly when you can easily weight the HA and Oiii images using pixel math but this can be accomplished by levels and curves in PS or Gimp.

❤️❤️❤️❤️This is great for stepwise procedure in Siril and Gimp workflow

Processing M31 Andromeda with free tools

❤️❤️❤️❤️How to combine image stacks of different exposures…

FAQ

…..

Sirilic

Sirilic

So far from what ipI understand is that images of different exposures are not to be combines as groups in DSS. Rather pre process the images separately and merge in Gimp.

DSS is used only for combining darks, flats and biases taken on different nights and with different filters.

DSS Manual

Technical Info

Astrophotography Speedrun – Stacking and Processing within 15 minutes using Siril

How to extract and combine image from dual band filter…

Notice that Siril works in 32 bit and can save in 32 bit now.

What is back focus between…

Backfocus with an ZWO Cooled Camera

Pre-processing images with Siril (EN)

This video below takes you completely through the Pixinsight steps to processs an OSC color camera 2 Color images taken with Optilong L Pro a dual narrowband….could be applied to a certain extent with Siril.

QHY268C Camera and the Cygnus Wall!

Completely manual image processing in Siril

❤️Using arcsin stretch plugin in PS…

The arcsin stretch can be done in Siril and is good to preserve star color…unfortunately during subsequent stretching there is no ability to make masks in Siril…so the stars will get bloated…so if want to stay in free 32 bit post processing then would have to reduce the stars later in the processing in PS which seems to be the best on the near finished image.

How to do Astrophotography: Star Color

❤️Combining multiple seq, multiple exposures, different cameras in Siril

Completely manual image processing in Siril

❤️❤️❤️❤️So to my understanding, according to the tutorial below, multiple sets of images taken from different night and hopefully can also apply to different cameras and be combined by first preprocess each camera for example and continuing the index numbering where the previous set left off…that way will take it as a single sequence….then register and stack as usual.

Combining sequences in Siril – Wolf Creek Observatory

…………………………..

❤️❤️❤️❤️This is an excellent site for tricks with Siril

Image Processing – Wolf Creek Observatory

❤️❤️❤️Follow this with QHY 268 and Optilong L Extr. Filter

Note that during the Color recombination he change to cie lab color and that reduced the noise.

Siril Beginner’s Tutorial! – Hubble Style OSC Narrowband With FREE Software!

Sensor Analysis with Sharpcap 

Astrophotography Cameras: How to use a OSC One Shot Color Astronomy Camera

How to image the Planets: Using PIPP, Autostakkert, Registax and GIMP

Top 5 tips for improving planetary views with your telescope

❤️❤️❤️Astro-Tools is a new script set you should download and add to Gimp. The tools have a object brightening and also a star reduction script.

Also note the steps in processing of when color calibration, stretching is done in this video. 

How to stack and process Deep Sky images with Siril and Gimp

……………

See coming soon…

Part 2 of “My On Going Image Processing…”

……………

Moon Imaging with A DSLR AND Backyard EOS ON A Tracking Mount

I have a Canon 70D DSLR that I bought about 6 years ago when I first started astrophotography…recently I wanted to find out the detail I would be able to achieve without a telephoto lens or a telescope on the moon with my DSLR…I was surprised. My basic lens kit that came with the camera only had a focal length maximum of 250 mm. I found that there was a solution without having to go into the expense of a buying a new lens….Backyard EOS.

The DSLR has a Live View mode but it is very difficult to get a good focus with such a small screen on the back of the camera. Backyard EOS software not only solves this problem but also has a 5x view that when used gives a 1:1 resolution, basically like the “Region Of Interest” as in dedicated astro cameras. In order to have a more detailed image it is best to record the Moon in Planetary Mode. Essentially this method is known as “lucky imaging” which amounts to taking a video instead of single images, in this case in avi format. This is another advantage of using Backyard EOS with your DSLR, as the in-camera video mode… the MOV file format is compressed and not ideal. The framerate that you can record will largely be determined by your computer using Backyard EOS. The resultant avi video is processed in AutoStakkert!3 to achieve a final stacked image…post processing can be done in a number of software including Photoshop, Siril, Gimp,Raw Therapee and Luminar.

A camera tripod would be the minimal for stability but still a better solution, a tracker would afford you more ease of use and a longer video recording before the Moon would move out of range of the camera fov. A crude polar alignment is all that is necessary and setting the tracking on moon instead of the stars, of course. Having a tracker will allow you to image the other planets as well and in this case framerate and your total imaging time would be more important because the planets rotate more rapidly than the Moon and to get the best result, image capture must be more rapid and within a certain total exposure time…for example it is recommended to video image Jupiter within 2 minutes to prevent blurring due to its rapid rotation.

If you prefer to take single images of the Moon the Manual Mode is the best to use. First go to settings on your camera and set up the 2 second delay timer…preventing camera vibration and image blurring due to the mirror. This done you will then be controlling ISO, aperture and shutter speed… in Backyard EOS set the cameras ISO to the lowest possible number…around ISO 100. Then set the aperture to about F11 and adjust the shutter speed to start at about 1/25 of a second. Adjust the shutter speed if too bright or too dark. To focus, zoom in on the Moon in Backyard EOS software and with the aid of the StdDEV Focus Tool find the best focus while the software takes a series of test shots automatically.

I have included below a few references to get you started…have fun and enjoy.

Introduction Backyard EOS…

Moon Photography For Beginners

PLANETARY IMAGING WITH YOUR DSLR CAMERA

14 Tips for Shooting the Moon

https://www.bhphotovideo.com/explora/photography/tips-and-solutions/14-tips-for-shooting-the-moon

———————————

Skywatcher Star Adventurer

An ongoing compilation of my notes and the most relevant sites that were very helpful to me and perhaps will also be to you….as an owner of of the Skywatcher Star Adventurer.

Clear Skies❤️

⭐️⭐️⭐️⭐️⭐️⭐️⭐️⭐️⭐️⭐️

The Star Adventurer has a maximum payload of 5kg or 11 lbs this is quite high for the size of the mount. Note that the counterweight is not considered to be part of the payload. As a rule of thumb, though, in astrophotography, it is considered a good practice to charge the mount to about 60-70% of its maximum payload capacity which means 6.5 to maximum of 7.7 lbs to preserve the motor life.

Payload:

Payload – Refers to the instrument payload

Load Capacity – Refers to combined instrument load and counterweights

All Up Weight – Refers to combined instrument load and counterweights

………………………

The payload weight is the weight carried by the mount’s saddle where the telescope is attached. The counterweights are not considered in payload calculations.

If you load the mount to the max it means wear on the gears and motor. Load capacity is a guideline, the actual load depends on your scope shape as well as many other factors. Longer scopes such as refractors and Newt will put greater strain on a mount than a short and compact SCT. You also need to consider a scope’s focal length and how much it would magnify mount errors.

Furthermore, low end manufacturers tends to over estimate their mount capacity (and give rating for visual use), while high end manufacturers tends to be more conservative and rate their mount for imaging. If you are imaging, the conventional wisdom is you should not load your Skywatcher, Celestron, Meade or Losmandy mounts beyond 50% of the stated capacity.

The counterweight isn’t counted towards the load capacity of the mount….but it is important in the total weight that the gears and motor have to turn and the longevity of the mount.

It isn’t just about the weight. Two factors to consider are the total weight (excluding the counterweight) and also where it is located e.g. Mass * Radius * Radius.

It is easier for the motor to guide/rotate if the weight is closer to the point of rotation. So given a choice of weights hanging off the end and more closer to the point of rotation the latter is preferable.

Hanging a guide scope outside of a main scope is an example of adding weight in the wrong place – problem is that it’s not easy to do something better.

……………

Initial Polar Alignment (with equipment on mount):

RA AXIS ALIGNMENT COULD ALSO BE DONE IN THE DAYLIGHT ALSO BY USING A WALL OR VERTICAL POLE BUT IT SEEMS REASONABLE TO PERFORM THIS PROCEDURE VIA THE FOLLOWING METHOD USING POLARIS DIRECTLY WHICH WOULD PROBABLY BE MORE PRECISE.

Once the Ra alignment has been done the image below shows how the polar scope Polaris position is adjusted corresponding to a reading in Polar Scope Align Pro

……………

An Easy Way To Correct The Polar Alignment After Framed Up Target:

This video is very important as it shows how to fine tune the precise polar alignment and to check it once you have done your framing or during imaging…..what I will do is attach the cel phone to the polar scope to set up polar alignment and check it during imaging.

Correct POLAR ALIGNMENT with ROTATED RETICLE and FRAMED UP TARGET on Sky-Watcher STAR ADVENTURER

……………………

Balancing:

Find the balance point of the scope lengthwise and mount it in the dovetail accordingly. Then while holding everything loosen the RA axis clutch and position the RA bracket horizontal to the mount and set the counterweight accordingly so the entire rig balances.

Balance first in Ra with equipment fully on and lens extended to mm used for your imaging. Now Open the RA and Dec screws and aim in region of sky of object to be imaged. Tighten the Dec screw. Notice which way tilting and slide the dove tail plate accordingly to get a balance….test it by rotating the equipment with the Ra screw lose…should not move in any direction you place the equipment along the RA axis.

Astrophotography Made Easy – Part 3: Setup

SkyGuider Pro / Star Adventurer Counterweight Tutorial – Update

………

Auto Guiding:

Below is a very good article which includes near the end of the article how to set up PHD2 auto guiding for the Star Adventurer.

Using The SkyWatcher Star Adventurer

A few more useful links….

PHD2 Guiding with Star Adventurer Mount

Star Adventurer and PHD2 guiding

Plea for help Guiding Star Adventurer – Mounts – Cloudy Nights

Autoguiding for Astrophotography