Gimp, Photoshop, StarTools, Raw Therapee, 32 bit processing….
also links to excellent and key tutorials to follow as you process your images
🔭🔭🔭🔭🔭🔭🔭🔭🔭🔭🔭
🔭😊⭐️This is a compilation of ongoing notes that I am creating and continually tweaking on the topic of image processing… as I continually follow the arduous path in learning this difficult but wonderful skill. Associated and included are key sites that I have found particularly useful.
Hope this will serve equally useful to you, my fellow hobbyists…
❤️Clear Skies,
Astronomy Notebook
https://www.facebook.com/groups/350767592003671/?ref=share
Calibration Frames
How To Obtain Darks, Flats And Bias Frames
To make stars Round…
If your stars are slightly oval try this in photoshop:
- Duplicate the image (ideally fully processed) as a new layer.
- Set the duplicate layer blending mode to “darken”
- Then apply Filters -> Other -> Offset and nudge the vertical and horizonal offset values until you get round stars.
❤️❤️❤️❤️❤️This video shows how to round all stars in image at once with the arrow keys and seems to be the best method.
How to fix elongated stars in Photoshop
How To Make Stars Smaller in Adobe Photoshop [For Beginners!]
❤️❤️❤️❤️This video is good to set an action to round up star individually
Rounding up stars and setting an action
❤️❤️❤️❤️The following video is probably one of the best method as it fixes all the stars at once by shifting with them with the keyboard arrow keys…almost like a simple derogation…because even if you have great guiding you may not be so well polar aligned and this will cause some rotation in your images as the imaging session progresses…
How to fix elongated stars in Photoshop
Reduce and Round Stars:
This video is the one to follow to get rounder stars…
❤️❤️❤️❤️❤️
StarTools Repair is also effective and has two modes of star
Features & Documentation: Repair: Star Rounding and Repair
Elongated Star Repair w/ PhotoShop
Οδηγός διόρθωσης του trail με το Photoshop.wmv
…………..
This video is great to follow completely, with free software using DSS, Siril, Gimp and Starnet:
Astrophotography processing – FREE SOFTWARE ONLY!!
…………
Nebula:
Here he does not deal with any star color…just size with respect to masking.
GIMP Astrophotography Editing Tutorial
Here nebula can gain more detail by adding this adjustment to the top layer and decreasing fade to approx 50%
Galaxies:
He does not deal with star color with his created masks in this vide.
ANDROMEDA GALAXY with only a Camera, Lens, & Tripod, Part 2a, Deep Sky Stacker & GIMP
……probably best to keep the gain low and use short exposures and stack lots of frames. Then, if you want to go really deep just add some frames with longer exposures and create an HDR. However, you can get perfectly adequate images without going to HDR.
Stars:
I too struggle with this,but I have found that shorter subs help. I use 150s subs for the RGB background. After you’ve blurred the stars to get the colour, try a little colour saturation (in your program of choice) and then use a sharpening tool to make them nice and solid again. I find if I do that, followed by a size reduction step or two for the larger stars, the stars star to look a bit more colourful.
Use Noels ‘increase star colour’ along with decent gaussian blur to colour up but soften the stars in bottom layer.
Set the top layer to ‘luminosity’ to restore sharpness.
The thing that made the difference for me was making a mask, just allowing work on the bigger stars, then switching to Lab mode and using the saturation slider a little… I thinks its come out pretty good… compared to my first go. It does something odd to the yellow stars… I got a few bicolour yellow blue stars that had to be erased! I have a way that works
*****❤️Read that should make a copy or original image and from that copy first work on stars in the image to get color and then take out the stars as a layer.
****Maybe during the process of stretching the image could highlight select the stars and copy and past them into a new layer…that is make them visible in that layer….turn those layers off until needed…could then recombine the stars into one star only layer to retain the size and star color or use opacity changes to bring out the stars. Also can use these star layers and merge and make a star mask to further process the main image while not affecting the size of the stars…that way when the star layer or layers are revisible in the image there will not be halos or star color changes to affect the star layer or layers contributing to the overall final image.********
………………………….
How to add back to the image the removed stars:
Process the No Stars image in the usual way, then process the original image so that just the stars show and not too much background nebulosity. Then copy this image and paste it in a new layer over the top of the starless image and set the blend mode to either Lighten or Screen…..whichever one works best. (Not sure however how the Screen effect in PS or similar software would affect the colour.)
……………………..
Star Clusters:
StarTools – a 4 minute process of Globular Cluster M13
……probably best to keep the gain low and use short exposures and stack lots of frames. Then, if you want to go really deep just add some frames with longer exposures and create an HDR. However, you can get perfectly adequate images without going to HDR.
……………….
This one applied to Gimp….make a duplicate top layer turned off in case get fringing so you can increase a Gaussian blur which the other guy in Gimp does not perform.
This technique is good to follow and parallel in Gimp for diffuse nebula RGB or other colour images to preserve star colours and size while stretching to get detail in nebula. But does not talk of manipulation of colours.
Astrophotography: Star control using Star Masks
❤️❤️❤️❤️………………………..
This video over all would be the main one to follow covering all aspects of regions to control in post processing in an image.
This video shows how to create select stars only to increase star saturation. Also by using both a star mask and using the selective and inverted mask of the more compact nebula or galaxy can work on the main regions of background or nebula or galaxy separately without affecting the stars.
Note that could also use the Gimp Quick Mask technique to select or invert regions to specifically process but the stars would be per this video.
How to Process Astrophotography Images using layer mask
……………………
❤️Gimp does not have arcs in stretch but if you do two arc sin curves with a levels in between in Gimp as in this tutorial but note the layer mode has to be changed….see tutorial. This will allow good stretch without loss of color.
Gimic plug-in better noise reduction than in native Gimp.
This video also has a good star reduction that can be done I Gimp. The highlighted stars could be used to specifically saturate and change the colours of the stars as well as to make a star mask.
Processing The Rosette Nebula in GIMP 2.10. Beginner level Processing Tutorial
****Align Images In Gimp****
The alignment tool works very well…note that in the astronomy plugins in Gimp there is an alignment script which might be good to try.
This alignment procedure will be necessary as I have not been able to align as yet different exposures in DSS….so then after stacking the images separately in DSS and separately post processing follow this step below to align the different exposure images in Gimp…..
How to align images visually using GIMP
Also alignment is also possible in PS…next two videos…
How To Align Stars in Photoshop Manually
How To Align Stars in Photoshop Manually
Note that is is used primarily for images taken with the same setup but different exposures and is based on rotational and vertical and horizontal adjustments using the arrow keys…see also the video in this article.
❤️❤️Also this video can easily be followed for time lapse and how to process the ground level silhouetted against the lower horizon.
How to Align Astrophotos in Photoshop | Easy Way to Combine Your Data
******Exposure Blending*****
Taking two images one faster exposure to reveal detail that would otherwise be blown out….These two following tutorials are excellent and through the use of layers and associated adjustments allow the creation of more dynamic depth in the image. Done in PS as in tutorial below could also be done in Gimp where the added advantage is being able to work in 32 bit….make sure the images are aligned before!
My One BEST Editing Trick For Orion
Orion Nebula HDR Tutorial (Fix the Bright Core in Photoshop)
******How to Expose the Foreground *******
How to Expose the Foreground in a Nightscape
Easy Exposure Blending Trick in GIMP (Tutorial)
……..
******Tonal Adjustment….better than selective colour in PS.
Raw Therapee ****
Ultimate Raw Therapee Colour Correction Regions – Get Total Control of Colour
………..
****Use Selective color in different ways to change colours and make masks******
❤️❤️❤️When your regions are difficult to isolate can choose selective color see specifically 11.06 point in this video to make a mask according to the selective colours and change the color or any other characteristic of that region.
How to Replace Color in Photoshop CC 2017 | Adjust Color Selectively
Select by color in Gimp….this looks as close as you can get by doing it in PS…this will work well…
Need to find the equivalent procedures in Gimp for this video….
How To Change The Color of ANYTHING In Photoshop | Select and Change ANY Color
…………….
Nik Collection
Introduction to the Nik Complete Collection
Nik Collection…see exe files on Desktop (portable computer)
The ColorEfex.exe app in the Nik folder on my desktop is the best of all of the Nik apps and works on 32bit files….
HDR image is well done by the Nik collection…choose bracketing imaging on DSLR or take a series of different exposures with ZWO.
(The images would have to be aligned first and can do this in Siril)
The HDR program in this collection would probably be good for getting rid of the reflective regions on the moon….just take different exposure sets and stack them individually in DSS.
….❤️but this procedure will not let you separately adjust and tweak the different exposures in an ongoing way before they are merged….so better to align the different exposures in say Gimp and tweak the individual exposure layers there. This method combined with imaging with a red
and/or an IR pass filter will probably work very well.
…….. Notes……
Luminosity Mask
Luminosity masks are basically layer masks that are built around specific tones in animage. They are derived from the image data itself, and focused on a specific range of tonal values. … Being able to selectively modify an image based on particular tonal regions can be a very powerful method of editing.
Note there is a luminosity mask creation script in Gimp. This can be used the same as selective colour in Gimp for processing very specific regions otherwise hard to do than by the lasso or tool selection….also note the luminosity masks that are automatically created in the script can be further changed by curves and levels.
Try using the luminosity masks created automatically with script in Gimp to perform precise and selective work on image….but will need a regular mask to protect specific regions or shapes in image.
Creating the Masks. To begin creating the masks we will need to first get a luminosity representation of the image. This is easily achieved by duplicating the base layer, and desaturating it using Luminosity as the conversion option.
……..
The Quick Mask
Can use this to select or protect regions or to paste these regions on other layers….good for galaxy images and maybe star clusters like m13. Need to feather these regions or is it automatically done?
***❤️Could probably use this to inverse the galaxy mask selection to select the back ground then use either desaturate or levels to darken the background or the eye dropper to set black levels…could also do a Gaussian Blur to regulate the background night sky from pollution or dust.
GIMP Quick Mask In-Depth Tutorial
Layer Masks in Gimp…
…….
A method that can select the background for processing to darker and no dust or light pollution: this involves drawing the lasso around the object….must do a feather of say 150 or less pixels so regions will not look harsh.
Gimp: How to Use the Quick Mask and How to Blur the Background
Also note that in PS there is an action script installed to get rid of space dust and does so gently and well…could do several repeats.
………………………..
Miscellaneous Notes:
Excellent over all info in astro processing not really using as specific steps to follow.
Nightscape Photography with Digital Cameras, Clarkvision.com
👍Using “Blend If” to Neutralise Sharpening Haloes in Photoshop – You Can’t Do This in Lightroom👍
Starnet removes the stars so you can work separately on the nebula and at the same times safe guard the stars from becoming bloated and or losing color….
But you don’t have to do this using Starnet…you can select the stars say using an action tool in PS which does a great job at selecting even the faint stars and in layers subtract the stars from the complete image as was done in this video….
****Note: Check if is possible to use the image of just the stars in 16 bit in PS and and perfect the stars there and bring it into Gimp and change mode to 32bit on that image to further add to the layers in Gimp, say to the starless image after that has been processed by itself.
Make Your Nebula POP Using Starnet++
Contrast using wavelets
Raw Therapee WAVELETS Basics: Power Processing with Wavelets in Raw Therapee 5.8
This is an excellent tutorial on white balance using the black, grey and black points…
Precise White Balance in Photoshop – The FAKE Grey Card Method
Raw Therapee Basics: High ISO Noise Reduction Using Wavelet Levels.
……………..
The video below shows how to do color calibration by RGB Balancing and also a different way to darken the background and remove gradient without Gradient Exterminator in PS….get rid of haze or noise in background by doing a mask and inverting it and then decreasing the saturation on the background.
Another way is to make a flat frame using Dust And Scratches and using the Spot Healing Tool to erase the galaxy….but this is done to the starless image.
Use this to stamp a complete image that incorporates all the below and placing the new image layer on top while still keeping the individual layers…the command is:
ctrl- alt -shift -E
****Note this could be done in Gimp while remaining in 32 bit processing instead…must find the equivalent process in Gimp for Dust And Scatches.
Learn Astrophotography Editing with this FREE Template | DeepSkyStacker/Photoshop Tutorial
……………..
❤️❤️❤️❤️Pixinsight excellent to follow for galaxy images
from batch stacking to processing….
How to Imaging and Process M31 In Ha LRGB
❤️❤️❤️❤️Bringing out the faint flux….
Going Deep on M81 and M82 Galaxies
…………………..
Using Levels and Curves:
❤️In this video below we see that first you must balance the colours…he does it by the histogram method. Next crop image if necessary and then use levels and curves to stretch image….of course he did not mask his stars in the stretching process but a a couple of stretches to bring out the star color it is best to do so….one approach is to make a working copy for star color and work on the stars separately….then the nebula in a separate image, perhaps mask the stars so they will get no bigger or further change color…work on nebula and try a screen with the star image on top to combine the separately worked on star and nebula image.
Using the historgram levels and curves
Here below in this video he adjusts the levels separately per channel giving a lot more control. When you are in levels to keep the background the proper hue, adjust the black point in the levels diagram on a per channel basis….while looking the effect in the color histogram.
How to stretch in PS…
STRETCHING Astrophotography in Photoshop Using Curves and Levels
How to use the Astronomy Tools Action set
Astronomy Tools Action Set Photoshop Overview
❤️❤️❤️❤️How to make colour images…
A Colour Primer for Astrophotography – RGB, LRGB, HaRGB, HaGB, Hubble Palette Narrowband & More!
………..
❤️❤️❤️Multi exposure images…how to combine…
Astrophotography – How do I create multi night images?
Combine Multiple Exposures (#Photoshop) for Amazing Landscapes
This refers to Pixinsight but is excellent on procedure concisely described…
Merging frme sets of different exposure lengths??
……….
Siril Imaging Post Processing…
How to edit DEEP SKY images in SIRIL – powerful FREE astrophotography software for Windows Mac Linux
PS Post Processing….
My 2021 Astrophotography Image Processing Tutorial!
Rogelio Bernal Andreo, Premium Astrophotography
………
Note that is is used primarily for images taken with the same setup but different exposures and is based on rotational and vertical and horizontal adjustments using the arrow keys…see also the video in this article.
❤️❤️Also this video can easily be followed for time lapse and how to process the ground level silhouetted against the lower horizon.
How to Align Astrophotos in Photoshop | Easy Way to Combine Your Data
❤️❤️❤️❤️Stacking different exposure times
Stacking different exposure times? – Beginning Deep Sky Imaging – Cloudy Nights
……….
Narrowband…
❤️❤️❤️❤️Dual band channel extraction
Duo narrowband OSC processing using Siril and some Photoshop
❤️
Hubble palette and star reduction
❤️❤️❤️❤️❤️Narrowband Post Processing….
How To Stack Monochrome RGB and SHO Images in DeepSkyStacker (DSS): Part 2 – Photoshop
Using hundreds or thousand of short narrowband subs?
Getting more colours from your dual band image….
Dual-Band Filter Processing for color cameras!
………….
❤️❤️❤️Post Processing in free software …workflow…
Astrophotography processing – FREE SOFTWARE ONLY!!
He does this in Startools…which is a great tutorial also in use of this software
20 min with ZWO ASI 2600 MC Pro vs 130 min with Canon EOS 60D on the Pleiades M45
Included here Imaging as this is so important to the final image….
ASI 2600mc pro: how to set the correct sensor temperature ?
Do a sensor analysis in Sharpcap on your new camera…
Astrophotography Cameras: How to use a OSC One Shot Color Astronomy Camera
I included this video here because a good image is the basis of a good result after post posting…
Deep Sky Astrophotography With CMOS Cameras by Dr Robin Glover
Method to establish proper gain

Duo narrowband OSC processing using Siril and some Photoshop
❤️❤️❤️❤️The video below is excellent on the use o Pixinsight in general as well and can be followed step by step.
How To Get Hubble Style Pictures From OSC Data! – Easy PixInsight Guide
The Optolong L-eXtreme Filter is INSANE!
Astro Pixel Processor Tutorial – Processing Dual Narrowband Data as HA/OIII BiColor
Siril Beginner’s Tutorial! – Hubble Style OSC Narrowband With FREE Software!
ADD H-Alpha to DSLR Exposures / Astrophotography Processing Tips & Tricks series Part 1
Dual-Band Filter Processing for color cameras!
Dual-Band Filter Processing for color cameras!
Hubble Palette look with a OSC camera, L-eNhance filter and Pixinsight!
Note also here in the video how the stretched image is made permanent by the histogram fenction
Hubble Palette look with a OSC camera, L-eNhance filter and Pixinsight!
Bicolor Channel Combination in PixInsight: How to get your Oiii data to POP
Astrophotography Duo-Band Filter Processing Tutorial
❤️❤️❤️❤️Note Dual narrow band OSC image registered aligned and stacked…the stacked image can in Siril be extracted, maybe try back ground extraction, neutralization and Color calibration and do a histogram stretch to go to non linear, extract the resultant image for HA and Oiii, save these two files as Tiff 16 bit…bring the two images into PS as layers do a levels and curves to try to get the Oiii to stand out more in final image. Then assign to RGB channels….adjust colours, details, noise finally and star size and roundness in preferred software.
Otherwise if the above procedure of extraction is not done on the dual narrowband image there will be a predominant red ha color and little color due to Oiii.
The procedure works well in Pixinsight…particularly when you can easily weight the HA and Oiii images using pixel math but this can be accomplished by levels and curves in PS or Gimp.
❤️❤️❤️❤️This is great for stepwise procedure in Siril and Gimp workflow
Processing M31 Andromeda with free tools
❤️❤️❤️❤️How to combine image stacks of different exposures…
…..
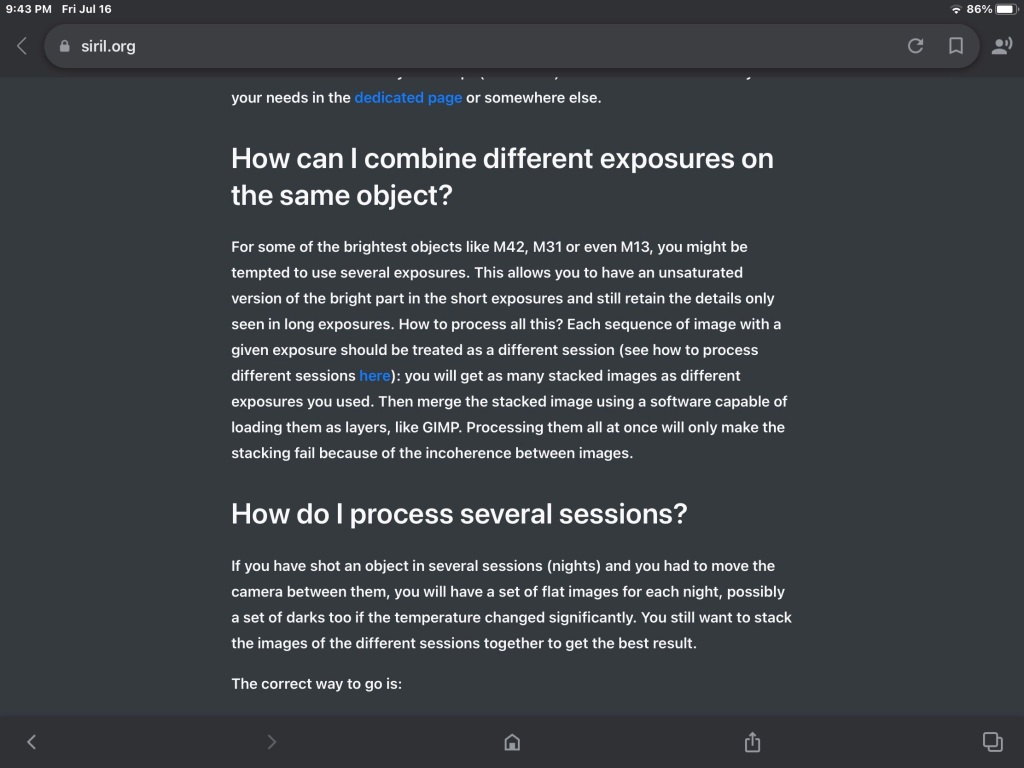

So far from what ipI understand is that images of different exposures are not to be combines as groups in DSS. Rather pre process the images separately and merge in Gimp.
DSS is used only for combining darks, flats and biases taken on different nights and with different filters.
DSS Manual
Astrophotography Speedrun – Stacking and Processing within 15 minutes using Siril
How to extract and combine image from dual band filter…
Notice that Siril works in 32 bit and can save in 32 bit now.
What is back focus between…
Backfocus with an ZWO Cooled Camera
Pre-processing images with Siril (EN)
This video below takes you completely through the Pixinsight steps to processs an OSC color camera 2 Color images taken with Optilong L Pro a dual narrowband….could be applied to a certain extent with Siril.
QHY268C Camera and the Cygnus Wall!
Completely manual image processing in Siril
❤️Using arcsin stretch plugin in PS…
The arcsin stretch can be done in Siril and is good to preserve star color…unfortunately during subsequent stretching there is no ability to make masks in Siril…so the stars will get bloated…so if want to stay in free 32 bit post processing then would have to reduce the stars later in the processing in PS which seems to be the best on the near finished image.
How to do Astrophotography: Star Color
❤️Combining multiple seq, multiple exposures, different cameras in Siril
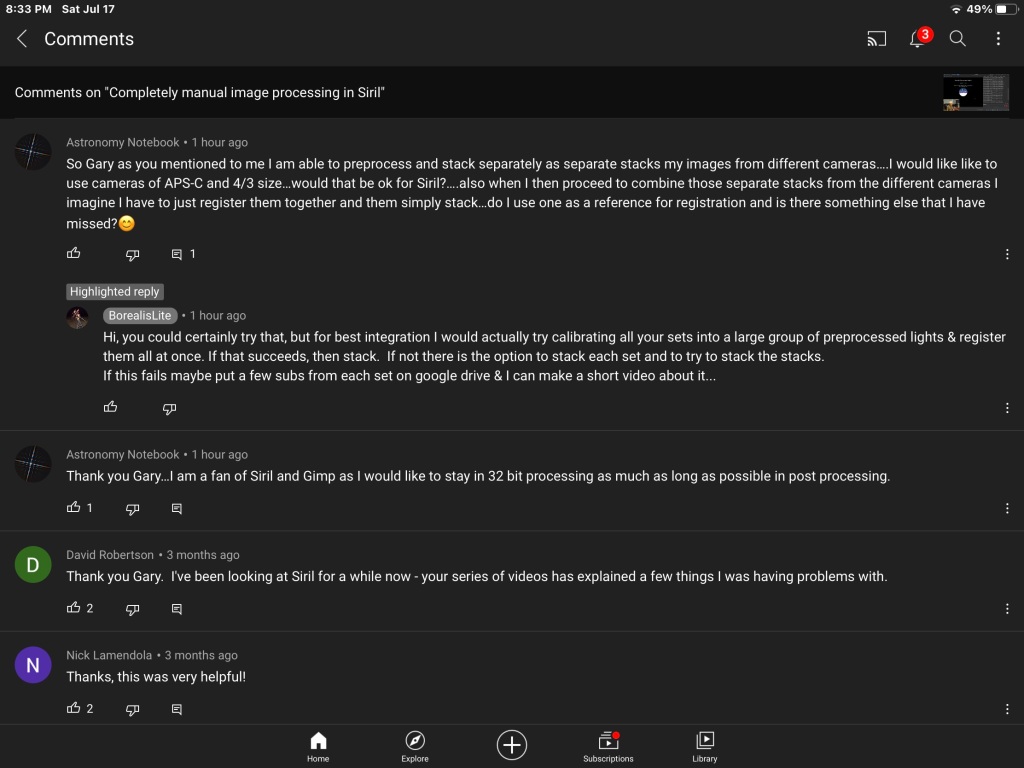
Completely manual image processing in Siril
❤️❤️❤️❤️So to my understanding, according to the tutorial below, multiple sets of images taken from different night and hopefully can also apply to different cameras and be combined by first preprocess each camera for example and continuing the index numbering where the previous set left off…that way will take it as a single sequence….then register and stack as usual.
Combining sequences in Siril – Wolf Creek Observatory
…………………………..
❤️❤️❤️❤️This is an excellent site for tricks with Siril
Image Processing – Wolf Creek Observatory
❤️❤️❤️Follow this with QHY 268 and Optilong L Extr. Filter
Note that during the Color recombination he change to cie lab color and that reduced the noise.
Siril Beginner’s Tutorial! – Hubble Style OSC Narrowband With FREE Software!
Sensor Analysis with Sharpcap
Astrophotography Cameras: How to use a OSC One Shot Color Astronomy Camera
How to image the Planets: Using PIPP, Autostakkert, Registax and GIMP
Top 5 tips for improving planetary views with your telescope
❤️❤️❤️Astro-Tools is a new script set you should download and add to Gimp. The tools have a object brightening and also a star reduction script.
Also note the steps in processing of when color calibration, stretching is done in this video.
How to stack and process Deep Sky images with Siril and Gimp
……………
See coming soon…
Part 2 of “My On Going Image Processing…”
……………
