April 9, 2021
Home Balcony
Canon 70D, lens at 200mm
SkyWatcher Star Tracker, Star Analyzer 100
Backyard EOS software
Discovered the use of the BYE software for focusing on the spectrum using a DSLR camera…it is a question of taking automatic series of images while manually adjusting the focus and checking the HFR.


April 18, 2021
Home Balcony
SkyWatcher Mak Newt 190
ZWO 1600, Televue Powermate 2x
Learned how to attach Powermate to imaging train.
Discovered that the addition file “conv” is great to add to layers post processing to bring out the details in the main image…so use it!
Also it was the first time used dark calibration in processing moon images…wonder if flat frames might also be useful here too…
To test:
Still cannot get the Powermate 4x to focus


April 19, 2021
Home Balcony
Skywatcher Mak Newt 190
ZWO 1600, Televue Powermate 2x
Star Analyzer 100
Sharpcap software
Discovered how to add the Televue Powermate to the imaging train previously by focusing on the moon in a previous session.
Used Sharpcap software to get good focus on the spectrum (not the star) by zooming in and adjusting focus manually on telescope.
The trick is to get the lines in the spectrum as narrow as possible.

May 27, 2021
Home Balcony
Solar Imaging
Lunt 70, ZWO 1600, Daystar Quark

Siril is great for post processing Ser video.
Imppg is great to process and sharpen images as well as to get the proms and surface detail out in same image. (See Solar Imaging and related topics in IPad NOTES)
May 29, 2021
Home Balcony
Lunt 70, ZWO 1600, Daystar Quark
Solar Imaging:
❤️❤️❤️❤️ discovered that using the roi instead of the full frame of the camera allows faster capture speeds but does not decrease the resolution…a solar spot or flare taken by this method was my best so far…also take it using Ser videos and lucky imaging…at the lowest exposure possible as this will allow for increase in capture speed.
❤️❤️❤️❤️ Locate a high-contrast part of the Sun. For white light imaging, the best target is the Sun’s edge. For more exotic filters, the Sun’s surface is normally sufficiently detailed for you to lock onto that. Even here, though, it’s good practice to choose a sunspot group or perhaps a dark hydrogen-alpha filament to give you a better focus.
❤️❤️❤️❤️Focusing method:
Zooming in in software help to focus as usual…
Also tried stretching button using the small histogram in Sharpcap and then focusing and then once satisfied reset the histogram…seemed to get better focus.
❤️❤️❤️❤️Perhaps the best additional focus technique is in Sharpcap Histogram….stretch the image using the icon….zoom in very deep and manually adjust focus, then go back and reset the image in the histgram
❤️❤️❤️❤️Also I believe in this image that are used dark and flat frames in calibration. The flat frames were created by the defocusing method.
Note:
Best to also include the solar location number of spot on Sun as well as not only date but also time in UT.
Use this site to get name of the current sunspots….
https://www.spaceweatherlive.com/en/solar-activity.html
Solar activity
It takes on average 27 days for the Sun to make one complete spin around its axis.
The Sun and Sunspots
https://www.weather.gov/fsd/sunspots
The spot below was either AR 2826 or 2827 and note it was near the AR 2828 which was said to be the cause of the large flare or prominence on the other side of the Sun in early July…see info video below my image that I took…


Some Background info on what happened in the month of July on the Sun…
Apparently AR 2846 was also another major sun spot or flare during this time…
NASA Detects Significant Solar Flare from the Sun on the Morning of July 3 2021
SOLAR ACTIVITY UPDATE: Solar Super Storm: July 15th, 2021..
Solar Storm Incoming! CME Sun Flare of July 20th Forecast to Reach Earth Today!
July 7, 2021
Home, balcony
Canon 70 D DSLR, Mak Newt 190, Orion 50, 162 mm guide scope,
ZWO 224 guide camera
DSLR Imaging With Mak
Note: To focus well requires first to find and focus the star field, preferably a bright star, in the view finder by first turning off the camera screen viewer. Then best to use BYE software and FWHM lowest number for stars…HFR highest number for lunar.
SGPRO and PHD2 seem to be problematic….although PHD2 is opened by SGPRO and proceeds to start guiding, SGPRO does not start imaging.
Found that it is best to open PHD2 first and to calibrate in region of interest, to stop it and then to start sequence.
So far getting Total RMS of about 0.85 “ in PHD2 without any tweaking.
It would be best to align the centre of guide scope with the main scope and then should get better guiding. So far can do at least 1 minute exposures without any observable star elongation…but 3 to 6 minutes does not produce too unacceptable result either. Multi star guiding is much better.
Check in my image processing notes as there is no problem to fix slightly elongated stars.
The DSLR needs no extension on the Mak Newt telescope and less then a finger width of extension outward in order to focus.
This time I set DSLR on bulb…try manual next time.
…………………..
To Test:
How to possibly attach ZWO 224 camera with Skywatcher Esprit 120:
See photo of DSLR, Orion 50 mm extender and Esprit 120
Use the Orion extender to screw onto the Field Flattener and then the 1.25 adapter for the 1.25 filter on the ZWO.
❤️❤️❤️❤️ was told that because the fov with this camera telescope combination is very small that the flattener is not needed and that could used the screw on 1.25 filter tube adapter to slip into the that of the telescope and the image would not suffer from elongated stars on the edges.
…………………
July 10, 2021
Home Balcony
Lunt 70, Orion 50 mm extension ZWO 224, Optilong L Extreme Filter
❤️Focus found at 6.5 mm on telescope focusing tube for future reference.
❤️Using this filter use exposure 20sec, gain approx 300
The Cresent Nebula was imaged using the Optilong L Extreme, 47, 60sec subs used to stack image…heavy in Ha but no Oiii detected in image after post processing.
❤️In order to focus on the stars do not need to switch out and use the lum filter although would initially be easier (must use the ZWO uv Ir cut filter)…instead use only the Optilong L Extreme filter at 20 sec exposure and 300 gain.
Stacking with Sharpcap is finicky but was able to do so M57, getting great colour…for some reason unable with NGC 6888…but found out in Sharpcap the day after that by raising the noise level in the settings of Sharpcap, post stacking could be done.
DSS for some reason was not able to stack NGC 6888 and center the image, although it could align the colours well.
❤️Discovered that there is a setting in DSS to get rid of the hot and cold pixels besides the one in the initial settings…see additional settings.
Siril was successfully used to calibrate and stack, used a combination of post processing tools, Gimp, PS, Luminar.
……..
To Test:
Would like to try adding the Oiii Narrowband to the image created.
And also to combine images of different exposures.
Also did not try to extract HA and Oiii from the OSC image in Siril in order to augment the Oiii….have to try that procedure.
…….

Aug 2, 2021
Home Balcony
Skywatcher Esprit 120
ZWO 1600
Nina 1.11 (Nightly Build)
Testing The 3 Point Polar Alignment Tonight…
As procedure to follow see on Polar Alignment particularly two videos the most useful…
Polar Alignment with Nina: 3 point anywhere in sky.
The Best New Polar Alignment Routine – With N.I.N.A
NINA Polar Alignment Using a Plugin (Polaris NOT Required!)
Tonight only got plate solving to work using the All Sky Plate-solver which does not need online backup …it is rather slow but reliable…also have to checkout why it constantly asks for confirmation of my telescope focal length….probably must reset up my equipment in Nina.
I was able to run the polar alignment routine and at one point it got me to 47’ total error…but it was windy interfering with this procedure.
Astap plate solver is supposed to work well in Nina…need to update and reinstall it and star database…H18
Did not have time to assess the step size and backlash size of focuser which must be left for next session.
…………
August 7, 2021
Notes: QHY 268C PH camera on my MSI laptop computer:
In Sharpcap use the QHY 268 C under the cameras section as it gives the most versatility wrt color and other controls…use the last Sharpcap Ver which I downloaded as there several on my computer.
In SGRO the camera also works with the current ver on my computer.
Note that temp control works in either of the above software. The maximum temp camera sensor can be lowered is 35 deg C BELOW AMBIENT temp…it is best to choose a temp for cooling that only causes the camera to work at about 33% power as this seems not to cause the camera body to get over heated to the touch. So say if outdoor temp is 20 deg C then could choose to cool down to 0 deg or to -5 deg C…do not set it so it will reach the maximum decrease as it will cause the camera to operate at 100% power….this level of power usage by the camera can be seen in the temp control section in SGPRO.
⭐️⭐️⭐️⭐️⭐️Also better NOT to run the ASCOM Diagnostics App to connect to the camera either in 32 or 64 bit because this is what messed up my set up that was previously working…also I then had to reinstall the ALL In One QHY install again choosing and checking off everything except software 3rd party but making sure to check off the SDK for the 3rd party software that I have already on my computer like Sharpcap and Nina.
…………….
August 11, 2021
Cloudy Skies in Montreal
Discovered how to attach my QHY 268 C to the Daystar Quark…
See image below…but need some short screws…hardware store hear I come.🤨
My Astro Imaging Journal
April 9, 2021
Home Balcony
Canon 70D, lens at 200mm
SkyWatcher Star Tracker, Star aAnalyzer 100
Backyard EOS software
Discovered the use of the BYE software for focusing on the spectrum using a DSLR camera…it is a question of taking automatic series of images while manually adjusting the focus and checking the HFR.


April 18, 2021
Home Balcony
SkyWatcher Mak Newt 190
ZWO 1600, Televue Powermate 2x
Learned how to attach Powermate to imaging train.
Discovered that the addition file “conv” is great to add to layers post processing to bring out the details in the main image…so use it!
Also it was the first time used dark calibration in processing moon images…wonder if flat frames might also be useful here too…
To test:
Still cannot get the Powermate 4x to focus

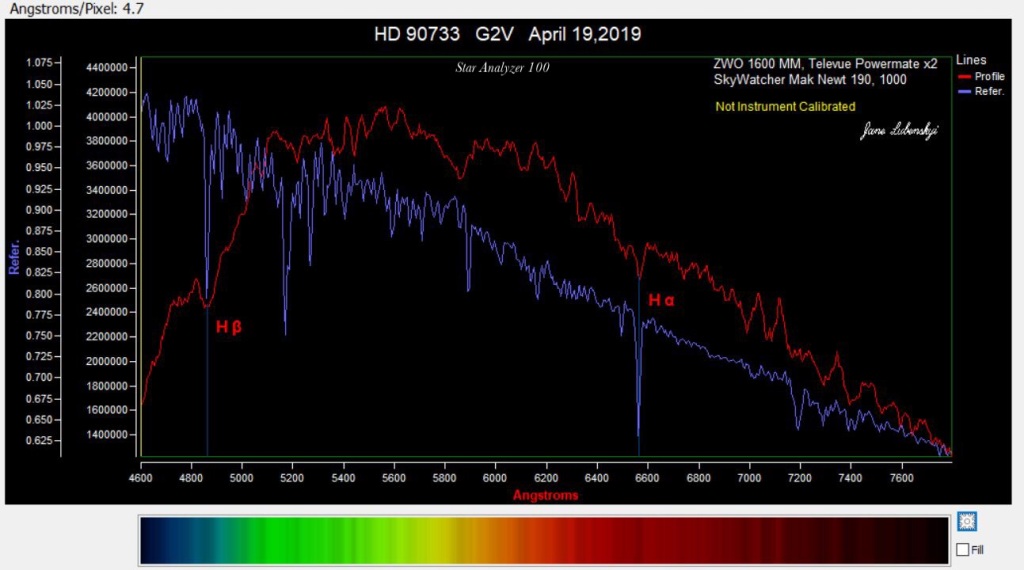
April 19, 2021
Home Balcony
Skywatcher Mak Newt 190
ZWO 1600, Televue Powermate 2x
Star Analyzer 100
Sharpcap software
Discovered how to add the Televue Powermate to the imaging train previously by focusing on the moon in a previous session.
Used Sharpcap software to get good focus on the spectrum (not the star) by zooming in and adjusting focus manually on telescope.
The trick is to get the lines in the spectrum as narrow as possible.

May 27, 2021
Home Balcony
Solar Imaging
Lunt 70, ZWO 1600, Daystar Quark

Siril is great for post processing Ser video.
Imppg is great to process and sharpen images as well as to get the proms and surface detail out in same image. (See Solar Imaging and related topics in IPad NOTES)
May 29, 2021
Home Balcony
Lunt 70, ZWO 1600, Daystar Quark
Solar Imaging:
❤️❤️❤️❤️ discovered that using the roi instead of the full frame of the camera allows faster capture speeds but does not decrease the resolution…a solar spot or flare taken by this method was my best so far…also take it using Ser videos and lucky imaging…at the lowest exposure possible as this will allow for increase in capture speed.
❤️❤️❤️❤️ Locate a high-contrast part of the Sun. For white light imaging, the best target is the Sun’s edge. For more exotic filters, the Sun’s surface is normally sufficiently detailed for you to lock onto that. Even here, though, it’s good practice to choose a sunspot group or perhaps a dark hydrogen-alpha filament to give you a better focus.
❤️❤️❤️❤️Focusing method:
Zooming in in software help to focus as usual…
Also tried stretching button using the small histogram in Sharpcap and then focusing and then once satisfied reset the histogram…seemed to get better focus.
❤️❤️❤️❤️Perhaps the best additional focus technique is in Sharpcap Histogram….stretch the image using the icon….zoom in very deep and manually adjust focus, then go back and reset the image in the histgram
❤️❤️❤️❤️Also I believe in this image that are used dark and flat frames in calibration. The flat frames were created by the defocusing method.
Note:
Best to also include the solar location number of spot on Sun as well as not only date but also time in UT.
Use this site to get name of the current sunspots….
Solar activity
It takes on average 27 days for the Sun to make one complete spin around its axis.
The Sun and Sunspots
https://www.weather.gov/fsd/sunspots
The spot below was either AR 2826 or 2827 and note it was near the AR 2828 which was said to be the cause of the large flare or prominence on the other side of the Sun in early July…see info video below my image that I took…

Some Background info on what happened in the month of July on the Sun…
Apparently AR 2846 was also another major sun spot or flare during this time…
NASA Detects Significant Solar Flare from the Sun on the Morning of July 3 2021
SOLAR ACTIVITY UPDATE: Solar Super Storm: July 15th, 2021..
Solar Storm Incoming! CME Sun Flare of July 20th Forecast to Reach Earth Today!
July 7, 2021
Home, balcony
Canon 70 D DSLR, Mak Newt 190, Orion 50, 162 mm guide scope,
ZWO 224 guide camera
DSLR Imaging With Mak
Note: To focus well requires first to find and focus the star field, preferably a bright star, in the view finder by first turning off the camera screen viewer. Then best to use BYE software and FWHM lowest number for stars…HFR highest number for lunar.
SGPRO and PHD2 seem to be problematic….although PHD2 is opened by SGPRO and proceeds to start guiding, SGPRO does not start imaging.
Found that it is best to open PHD2 first and to calibrate in region of interest, to stop it and then to start sequence.
So far getting Total RMS of about 0.85 “ in PHD2 without any tweaking.
It would be best to align the centre of guide scope with the main scope and then should get better guiding. So far can do at least 1 minute exposures without any observable star elongation…but 3 to 6 minutes does not produce too unacceptable result either. Multi star guiding is much better.
Check in my image processing notes as there is no problem to fix slightly elongated stars.
The DSLR needs no extension on the Mak Newt telescope and less then a finger width of extension outward in order to focus.
This time I set DSLR on bulb…try manual next time.
…………………..
To Test:
How to possibly attach ZWO 224 camera with Skywatcher Esprit 120:
See photo of DSLR, Orion 50 mm extender and Esprit 120
Use the Orion extender to screw onto the Field Flattener and then the 1.25 adapter for the 1.25 filter on the ZWO.
❤️❤️❤️❤️ was told that because the fov with this camera telescope combination is very small that the flattener is not needed and that could used the screw on 1.25 filter tube adapter to slip into the that of the telescope and the image would not suffer from elongated stars on the edges.
…………………
July 10, 2021
Home Balcony
Lunt 70, Orion 50 mm extension ZWO 224, Optilong L Extreme Filter
❤️Focus found at 6.5 mm on telescope focusing tube for future reference.
❤️Using this filter use exposure 20sec, gain approx 300
The Cresent Nebula was imaged using the Optilong L Extreme, 47, 60sec subs used to stack image…heavy in Ha but no Oiii detected in image after post processing.
❤️In order to focus on the stars do not need to switch out and use the lum filter although would initially be easier (must use the ZWO uv Ir cut filter)…instead use only the Optilong L Extreme filter at 20 sec exposure and 300 gain.
Stacking with Sharpcap is finicky but was able to do so M57, getting great colour…for some reason unable with NGC 6888…but found out in Sharpcap the day after that by raising the noise level in the settings of Sharpcap, post stacking could be done.
DSS for some reason was not able to stack NGC 6888 and center the image, although it could align the colours well.
❤️Discovered that there is a setting in DSS to get rid of the hot and cold pixels besides the one in the initial settings…see additional settings.
Siril was successfully used to calibrate and stack, used a combination of post processing tools, Gimp, PS, Luminar.
……..
To Test:
Would like to try adding the Oiii Narrowband to the image created.
And also to combine images of different exposures.
Also did not try to extract HA and Oiii from the OSC image in Siril in order to augment the Oiii….have to try that procedure.
…….


Aug 2, 2021
Home Balcony
Skywatcher Esprit 120
ZWO 1600
Nina 1.11 (Nightly Build)
Testing The 3 Point Polar Alignment Tonight…
As procedure to follow see on Polar Alignment particularly two videos the most useful…
Polar Alignment with Nina: 3 point anywhere in sky.
The Best New Polar Alignment Routine – With N.I.N.A
NINA Polar Alignment Using a Plugin (Polaris NOT Required!)
Tonight only got plate solving to work using the All Sky Plate-solver which does not need online backup …it is rather slow but reliable…also have to checkout why it constantly asks for confirmation of my telescope focal length….probably must reset up my equipment in Nina.
I was able to run the polar alignment routine and at one point it got me to 47’ total error…but it was windy interfering with this procedure.
Astap plate solver is supposed to work well in Nina…need to update and reinstall it and star database…H18
Did not have time to assess the step size and backlash size of focuser which must be left for next session.
…………
August 7, 2021
Notes: QHY 268C PH camera on my MSI laptop computer:
In Sharpcap use the QHY 268 C under the cameras section as it gives the most versatility wrt color and other controls…use the last Sharpcap Ver which I downloaded as there several on my computer.
In SGRO the camera also works with the current ver on my computer.
Note that temp control works in either of the above software. The maximum temp camera sensor can be lowered is 35 deg C BELOW AMBIENT temp…it is best to choose a temp for cooling that only causes the camera to work at about 33% power as this seems not to cause the camera body to get over heated to the touch. So say if outdoor temp is 20 deg C then could choose to cool down to 0 deg or to -5 deg C…do not set it so it will reach the maximum decrease as it will cause the camera to operate at 100% power….this level of power usage by the camera can be seen in the temp control section in SGPRO.
⭐️⭐️⭐️⭐️⭐️Also better NOT to run the ASCOM Diagnostics App to connect to the camera either in 32 or 64 bit because this is what messed up my set up that was previously working…also I then had to reinstall the ALL In One QHY install again choosing and checking off everything except software 3rd party but making sure to check off the SDK for the 3rd party software that I have already on my computer like Sharpcap and Nina.
…………….
August 11, 2021
Cloudy Skies in Montreal
Discovered how to attach my QHY 268 C to the Daystar Quark…
See image below…but need some short screws…hardware store hear I come.🤨


