An ongoing compilation of my notes and the most relevant sites that were very helpful to me and perhaps will also be to you….as an owner of of the Skywatcher Star Adventurer.
Clear Skies❤️


⭐️⭐️⭐️⭐️⭐️⭐️⭐️⭐️⭐️⭐️
The Star Adventurer has a maximum payload of 5kg or 11 lbs this is quite high for the size of the mount. Note that the counterweight is not considered to be part of the payload. As a rule of thumb, though, in astrophotography, it is considered a good practice to charge the mount to about 60-70% of its maximum payload capacity which means 6.5 to maximum of 7.7 lbs to preserve the motor life.
Payload:
Payload – Refers to the instrument payload
Load Capacity – Refers to combined instrument load and counterweights
All Up Weight – Refers to combined instrument load and counterweights
………………………
The payload weight is the weight carried by the mount’s saddle where the telescope is attached. The counterweights are not considered in payload calculations.
If you load the mount to the max it means wear on the gears and motor. Load capacity is a guideline, the actual load depends on your scope shape as well as many other factors. Longer scopes such as refractors and Newt will put greater strain on a mount than a short and compact SCT. You also need to consider a scope’s focal length and how much it would magnify mount errors.
Furthermore, low end manufacturers tends to over estimate their mount capacity (and give rating for visual use), while high end manufacturers tends to be more conservative and rate their mount for imaging. If you are imaging, the conventional wisdom is you should not load your Skywatcher, Celestron, Meade or Losmandy mounts beyond 50% of the stated capacity.
The counterweight isn’t counted towards the load capacity of the mount….but it is important in the total weight that the gears and motor have to turn and the longevity of the mount.
It isn’t just about the weight. Two factors to consider are the total weight (excluding the counterweight) and also where it is located e.g. Mass * Radius * Radius.
It is easier for the motor to guide/rotate if the weight is closer to the point of rotation. So given a choice of weights hanging off the end and more closer to the point of rotation the latter is preferable.
Hanging a guide scope outside of a main scope is an example of adding weight in the wrong place – problem is that it’s not easy to do something better.
……………
Initial Polar Alignment (with equipment on mount):
RA AXIS ALIGNMENT COULD ALSO BE DONE IN THE DAYLIGHT ALSO BY USING A WALL OR VERTICAL POLE BUT IT SEEMS REASONABLE TO PERFORM THIS PROCEDURE VIA THE FOLLOWING METHOD USING POLARIS DIRECTLY WHICH WOULD PROBABLY BE MORE PRECISE.

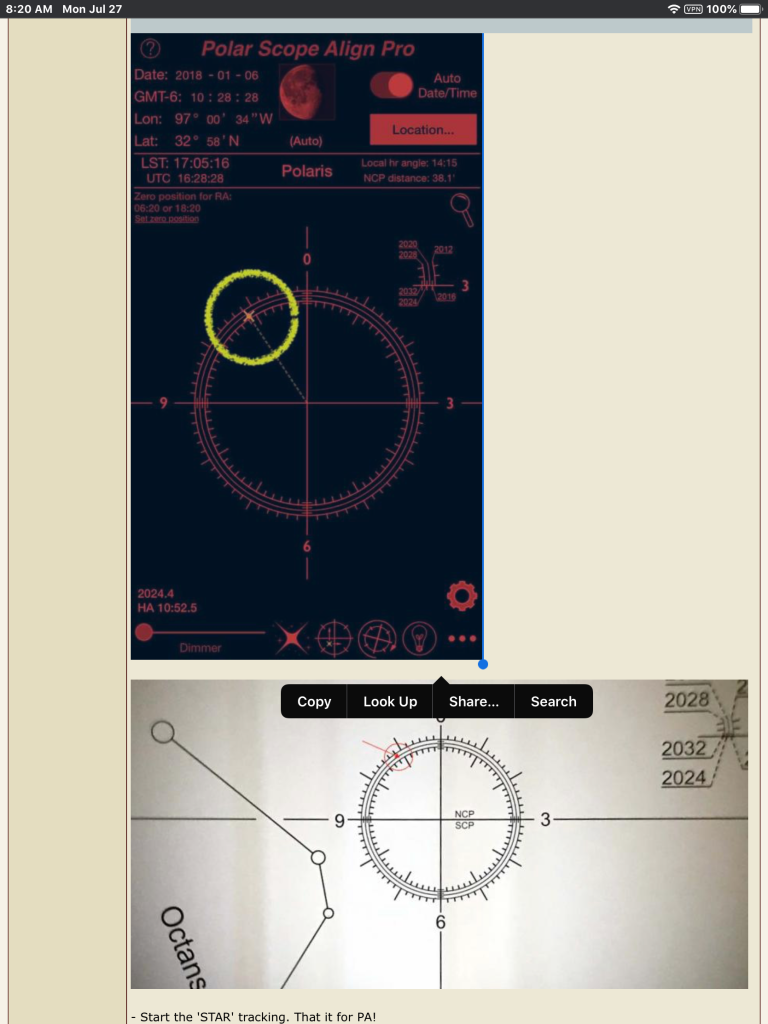
Once the Ra alignment has been done the image below shows how the polar scope Polaris position is adjusted corresponding to a reading in Polar Scope Align Pro

……………
An Easy Way To Correct The Polar Alignment After Framed Up Target:
This video is very important as it shows how to fine tune the precise polar alignment and to check it once you have done your framing or during imaging…..what I will do is attach the cel phone to the polar scope to set up polar alignment and check it during imaging.
Correct POLAR ALIGNMENT with ROTATED RETICLE and FRAMED UP TARGET on Sky-Watcher STAR ADVENTURER
……………………
Balancing:
Find the balance point of the scope lengthwise and mount it in the dovetail accordingly. Then while holding everything loosen the RA axis clutch and position the RA bracket horizontal to the mount and set the counterweight accordingly so the entire rig balances.
Balance first in Ra with equipment fully on and lens extended to mm used for your imaging. Now Open the RA and Dec screws and aim in region of sky of object to be imaged. Tighten the Dec screw. Notice which way tilting and slide the dove tail plate accordingly to get a balance….test it by rotating the equipment with the Ra screw lose…should not move in any direction you place the equipment along the RA axis.
Astrophotography Made Easy – Part 3: Setup
SkyGuider Pro / Star Adventurer Counterweight Tutorial – Update
………
Auto Guiding:
Below is a very good article which includes near the end of the article how to set up PHD2 auto guiding for the Star Adventurer.
Using The SkyWatcher Star Adventurer
A few more useful links….
PHD2 Guiding with Star Adventurer Mount
Star Adventurer and PHD2 guiding
Plea for help Guiding Star Adventurer – Mounts – Cloudy Nights
